Crossing the Finish Line–Lessons Learned During #VDM30in30

Legend has it that, following the Athenian victory over the Persians at the Battle of Marathon in 490 BC, a runner named Philippides ran 26.2 miles back to Athens, announced the victory, and promptly died of exhaustion.  That legend, which I recall being in my high school history book, is inaccurate at best, and historians believe that it stems from the story of Pheidippides, who ran from Athens to Sparta in two days to call the Spartans to war against Persia.

As Jonathon Frappier said earlier this month, “Blogging is a marathon, not a sprint.” A 30 day blog challenge good pacing to avoid burnout and commitment to power through when you hit that creative wall.

This post will be post number 30 for November, and I will officially be dragging myself across the finish line for the VDM30in30 challenge.  I feel that I’ve grown as a writer and a technologist during this event.

I’d like to thank Eric Wright (@discoposse), Melissa Palmer (@vmiss33) and Jonathan Frappier (@jfrappier) for putting this together, Angelo Luciani (@AngeloLuciani) for helping to aggregate all the content, and everyone who participated in this event.

I hope you enjoyed my posts during November, and please feel free to let me know what you thought on Twitter or by email.

PS – I never did get around to writing fiction set in the Virtual Design Master universe.  Fiction writing is a completely different beast, and it requires a lot more planning than technical blog posts.

Sunday Recipe–The Art of Chicago Style Pizza #VDM30in30

The Windy City is well known for some of it’s culinary delights – Chicago-Style hot dogs, Maxwell Street polish sausage, Italian Beef sandwiches, and deep dish pizza.  It seems like you can get one these staples on practically any intersection, and there are very successful local chains that specialize in these foods.

When it comes to Chicago-Style Deep Dish pizza, there are fewer options.  The main purveyors of these foods are a few restaurants – Giordano’s, Gino’s, Pizzeria Uno, and Lou Malnati’s.  Lou’s is very well known, and they have restaurants all across the Chicago area.

I grew up in Schaumburg, IL, a Chicago suburb most commonly known for Woodfield Mall and having one of the first Ikea stores in the United States.  After high school, I moved to Wisconsin for college. 

Its not impossible to find a good pizza in Wisconsin, but it can be tough.  There are very few good local pizza places, and they rarely do any Chicago Style pizza.  Lou Malnati’s and Gino’s both ship frozen pre-cooked Deep Dish pizzas, but it’s just not that same as getting one fresh from the oven.

There are some Uno’s around…but let’s not get into that.

The only way to get a good taste of home fresh from the oven is to make it yourself.

What is Chicago Style Pizza?

Before we can talk about how to make Chicago Style pizza, we have to define exactly what it is.

If you think about pizza is usually layered, it goes crust – sauce – cheese+toppings. Chicago style pizza is fundamentally different – and it’s layered crust – cheese – toppings – sauce. 

Note: There are three kinds of Chicago Style Pizza.  Deep dish style, which is the kind mentioned above, a thin crust variety which has more of a cracker-like crust, and the Giordano’s stuffed pizza.  Stuffed pizza is similar to deep dish pizza, but it has an extra layer of crust between the cheese/toppings and the sauce.

Making Chicago Style Pizza

The pizza making community isn’t that different from the virtualization community.  The people who are active in it are very passionate about their craft and open to sharing dough formulas, sauce recipes, and other tips.  There is an entire community on the forums at pizzamaking.com dedicated to Chicago Style pizza with members who have spent considerable time attempting to replicate the formulas for the larger chain restaurants.

In order to make the dough, you will need a heavy stand mixer such as a KitchenAid and a scale.  All of the recipes are expressed in baker’s percentages, so the ingredients will need to be weighed.  Pizzamaking.com does include a page with dough calculators to convert the baker’s percentages to weights.

There are two dough recipes that I have had very good results with.  These recipes are:

Some people are very particular about the brand of flour, yeast, and oil that they use, but you don’t need to use the exact same brands as the recipe calls for.  You should, however, follow the directions closely as under or over-mixing can ruin the batch.

Once the dough has risen, I like to put it into a Ziplock bag and let it rest in the fridge for a couple of days.  This makes the dough easier to work with when I bake the pizza.  You don’t have to do this, though – you can use the dough right after it has been through the first rise.

When it comes time to bake the pizza, you will need to use a 2” deep round metal pizza pan such as this 14” non-stick pan.  A pizza stone is not required, but it can help during baking.  I usually put my pizza stone in before I preheat the oven, and I will place the pizza pan on it during baking.

If you prepared your dough in advance and refrigerated it, you will want to take it out of the fridge and place it in the pizza pan to warm up.  I usually let it do this for about an hour as it makes the dough easier to work with.  You will want to start preheating your oven at the same time.  I set the temperature to 450 and let it preheat for an hour, and I will turn the temperature down to 425 before I put the pizza in to bake.

Once the dough has warmed up, you will want to oil the bottom of the pan with a little corn or vegetable oil and then spread the dough out.  Don’t pinch the dough up the sides of the pan – just leave it a little thicker at the edges. 

Once the dough has been spread out, take a regular fork and dock the dough by pressing the fork all the way through.  This helps the dough bake up a little crispier.

Once you have the dough in the pan, it’s time to top the pizza.  The ingredients you will need for topping your pizza are:

  • 8 ounces of shredded mozzarella cheese
  • 1 pound of bulk Italian Sausage
  • 1 28 oz. can of crushed tomatoes

The first layer is mozzarella cheese.  You will need to spread the cheese around on the crust, leaving about 1/2 to 1 inch on the edges.  Most recipes call for using mozzarella sliced from block of cheese, but I use pre-shredded cheese from the store.  I usually use about 8 ounces of shredded cheese.

The next layer is the toppings.  A traditional Chicago Style pizza is topped with Italian Sausage, but you can use any combination of meats and vegetables that you prefer.  If you’re using bulk Italian Sausage from a butcher, you’ll want to roughly shape them into little balls about .75 to 1.25 inches in diameter and place them on top of the cheese.

The last layer that goes on the pizza before being placed into the oven is the sauce.  The sauce consists of one 28 oz. can of crushed tomatoes.  Any brand of crushed tomatoes will work.  If you have a fine-meshed strainer, you will want to drain out as much water as you can.  The texture of the tomatoes should look like a thick, chunky tomato paste after you drain the water off.

You will want to spread this mixture over the pizza as best as you can.  Don’t worry if it doesn’t look like you have enough tomato to cover the pizza – it will loosen up and spread out as the pizza cooks.  If you add another can, you will end up with pizza soup.  Trust me on this – I’ve made this mistake too many times.

After the sauce has been placed on top of the pizza, you will need to turn your oven down to 425 and place the pizza in for baking.  It takes about 30-35 minutes to cook the pizza, and you will want to rotate the pan 180 degrees after 15 minutes.

When your pizza is done, it should rest for a few minutes to cool down before cutting it into wedges.  You will need a spatula or a pie server to remove the pizza from the pan.

A finished pizza should look something like this:

2012-11-21_18-38-45_896

Horizon View 6.0 Load Balancing Part 1#VDM30in30

Redundancy needs to be a consideration when building and deploying business critical systems.  As user’s desktops are moved into the data center, Horizon View becomes a Tier 0 application that needs to be available 24/7 as users will not be able to work if they can’t get access to a desktop.

Horizon View is built with redundancy in mind.  A single View Pod can have up to 7 Connection Servers to support 10000 active desktop sessions, and the new View Cloud Pod features allows up to four View Pods to be stretched across two geographic sites.

Just having multiple connection servers available for users isn’t enough.  That doesn’t help users if they can’t get to the other servers or if a load-balancing technology like DNS Round Robin tries to send them to an offline server.

Load Balancers can be placed in front of a Horizon View environment to distribute connections across the multiple Connection Servers and/or Security Servers.  There are some gotcha’s to be aware of when load balancing Horizon View traffic, though.

VMware doesn’t appear to provide any publicly available documentation on load balancing Horizon View traffic, and most of the documentation that is available appears to be from the various load balancing vendors.  After reading through a few different sets of vendor documentation, a few commonalities emerge.

Horizon View Network Communications

Before we can go into how to load balance Horizon View traffic , let’s talk about how clients communicate with the Horizon View servers and the protocols that they use.

There are three protocols used by clients for accessing virtual desktops.  Those protocols are:

  • HTTPS – HTTPS (port 443) is used by Horizon clients to handle  user authentication and the initial communications with the Connection or Security server.
  • PCoIP – PCoIP (port 4172) is the remote display protocol that is used between the Horizon Client and the remote desktop. 
  • Blast – Blast (port 8443) is the remote display protocol used by HTML5-compatible web browsers.

Remote Desktop Protocol (RDP) is also a connectivity option. 

When a user connects to a Horizon View environment using either the web client for Blast or the Horizon Client application for PCoIP, the initial communications take place over HTTPS.  This includes authentication and the initial pool or application selection.  Once a pool or application has been selected and the session begins, communications will switch to either Blast or PCoIP.

In the example above, the user connects to the fully-qualified domain name of the security server.  After authenticating, they select a pool and connect using the protocol for that pool.  If they’re connecting over PCoIP, they connect to the IP address of the server, and if they connect over Blast, the connection goes through the URL of the server. 

6

The URLs used by clients when connecting through a security server.  The PCoIP URL is the external IP address used by the server.

When a load balancer is inserted into an environment to provide high availability for remote access, things change a little.  The initial HTTPS connection hits the load balancer first before being distributed to an available connection or security server.  All PCoIP and/or Blast traffic then occurs directly with the security server.

HorizonViewLoadBalancing

This can have some implications for the certificates that you purchase and install on your servers, especially if you plan to use Blast to allow users to access desktops from a web browser.  If you choose not to use HTTPS offloading, the certificate that is installed on the load balancer also needs to be installed on the security servers.  This may require a SAN certificate with the main external URL and the Blast URLs for all servers.

Load Balancing Requirements

There are a few requirements for load balancing your Horizon View environment.  These requirements are:

  • At least 2 Security or Connection Servers
  • A load balancer that supports HTTPS persistence, usually JSESSIONID

If you’re load balancing external connections, you’ll need an IP address for each security server and an IP address for the load balancer interface.  If you have two security servers, you will need a total of three public IP addresses.

In an upcoming post, I will walk through the steps of load balancing a Horizon View environment using a Kemp virtual Load Master.

Horizon View 6.0 Application Publishing Part 5: Manually Publishing an Application

The last post covered the process of creating an application pool using applications that have been installed on the server and are available to all users through the start menu.  But what if the application you need to publish out is not installed for all users or not even installed at all?

The application that needs to be published out might be a simple executable that doesn’t have an MSI installer.  It could be a ThinApp package located on a network share.  Or it could even be a web application that needs to be accessed from non-secure environments.  Whatever the reason, there may be times where an application will need to be published out that isn’t part of the default application list.

The steps for manually publishing an application are:

1.  Log into View Administrator

2.  In the Inventory panel, select Application Pools.

image

3. Click Add to create a new pool.

image

4. Select the RDS Farm you want to create the application in from the dropdown list and then click “Add application pool manually.”

image

5. Enter the following required fields.:

  • ID – The pool ID.  This field cannot have any spaces.
  • Display Name – This is the name that users will see in the Horizon Client.
  • Path – The path to the application executable.  This must be the full file path of the executable.
  • Description – A brief description of the application.

image

The following parameters are optional:

  • Version – The version number of the application
  • Publisher – The person or company that created or published the application
  • Parameters – Any command line parameters that need to be passed to the application executable. 

6. Make sure that the Entitle Users box is checked and click Finish.

image

7. Click Add to bring up the Find User or Group wizard.

image

8. Search for the Active Directory user or group that should get access to the application.  Select the user/group from the search results and click OK.

image

9. Click OK to finish entitling users and/or groups to pools.

10. Log into your Horizon environment using the Horizon Client.  You should now see your published application as an option with your desktop pools.

Note: You need to use version 3.0 or later of the Horizon client in order to access published applications.  Published applications are not currently supported on Teradici-based zero clients.

image

The Things I’m Thankful For–#VDM30in30

The United States is celebrating Thanksgiving today.  It’s a day to sit back, take stock of the good things in your life, and give thanks to the deity of your choice for them. 

It’s also a day for lots of turkey, football, family, and ironically (and unfortunately) the day that people rush out to buy the things they want at extremely low prices.

A Quick History Lesson

Tradition holds that the “First Thanksgiving” was held by the Pilgrims in 1621 to celebrate the harvest and give thanks to God for seeing them through the year.  That festival, which lasted three days, was celebrated with the Wampanoag tribe. 

The Thanksgiving holiday that we enjoy today wouldn’t be ritualized until 1863 when President Abraham Lincoln issued an order declaring the last Thursday in November to be a national day of thanksgiving, and it wouldn’t be fixed to the fourth Thursday in November until 1942.

What I’m Thankful For

I have a lot to be thankful for.  Some of those things are:

  • My wife, who is an amazing woman who puts up with a lot from me.  She is the rock in my life, and I would be lost without her.
  • My kids, who push me to keep learning more and never settle so they can have a chance at even better opportunities than I have.
  • A great community that now includes many friends and has provided opportunities to learn from the best at what they do
  • A great boss and amazing co-workers

Today is a day to think about the people and the things that you’re thankful for.

Horizon View 6.0 Application Publishing Part 3: Creating An RDS Farm #VDM30in30

The previous post covered the steps for configuring a Windows Server with the Remote Desktop Session Host role and installing the Horizon View agent.  There is one more step that need to be completed before applications can be published out.

That step is creating the server farm.  In Horizon View terms, a farm is a group of Windows Servers with the Remote Desktop Services role.  They provide redundancy, load balancing, and scalability for a remote desktop pool, multiple published application pools, or both for a group of users.

The steps for setting up an RDS Farm are:

1. Log into View Administrator

2. In the Inventory side-panel, expand Resources and select Farms.

image

3. Click Add to create a New RDS Farm.

image

4.  Enter a name for the pool in the ID field and a description for the pool.  The name cannot have any spaces.  Click Next to continue.

You can also use this page to configure the settings for the farm.  The options are:

  • Default Display Protocol – The default protocol used by clients when connecting to the application
  • Allow users to choose protocol – Allows users to change the protocol when they connect to their applications
  • Empty SessionTimeout – the length of time a session without any running applications remains connected
  • Timeout Action – Determine if the user is logged out or disconnected when the Empty Session Timeout expires.
  • Log Off Disconnected Sessions – Determines how long a session will remain logged in after a user has disconnected their session

image

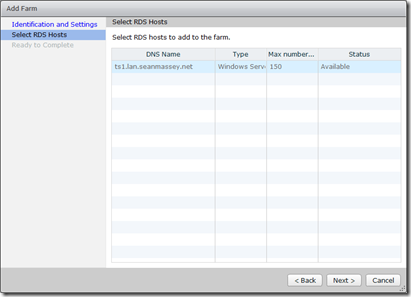
5. Select the RDS host or hosts to add to the Farm and click next to continue.

image

6. Review the settings and click Finish.

image

Once you have a farm created and an RDS host assigned, you can create application pools.  This will be covered in the next article in this series.

Horizon View 6.0 Application Publishing Part 2: Building Your Terminal Servers #VDM30in30

The application publishing feature of Horizon 6.0 utilizes the capabilities of the Remote Desktop Session Host role.  This requires servers with the role installed and licensed in order to publish applications.

Sizing RDS Servers

There isn’t a lot of guidance from VMware on sizing servers for application publishing.  Microsoft guidelines for sizing the Remote Desktop Session Host can be used, though.  The Microsoft recommendations are:

  • 2 GB of RAM for each CPU core allocated to the system
  • 64 MB of RAM for each user session
  • Additional RAM to meet the requirements of the installed applications

With these guidelines in mind, a server that has 4 vCPUs and sized for 50 users would need 11 GB of RAM allocated before accounting for additional RAM to support application requirements.

The local system drive should be large enough to accommodate the user profiles for all logged in users, temporary files, and other application data.  Drive space should be monitored carefully, and unneeded log, temp, and data files should be cleaned up periodically.

Group Policy Settings

There is a good chance that you will have more than one RDSH server in your application publishing pool.  Group Policy should be used to ensure consistent configuration across all servers in the pool.  A number of Remote Desktop Services specific policies, such as restricting users to a single session, can only be configured using group policy in Server 2012 R2.  Specific Group Policy guidelines for application publishing will be covered in another article.

Building and Deploying A Server

When you’re building up a server image for Terminal Servers, you should consider building up a new server image (or deploy from an existing barebones template), install the Remote Desktop Session Host role, and configure your base applications.  This will allow you to quickly deploy RDS servers more quickly than if you would have to build them from scratch and install your business applications on them.  This will also require periodic template maintenance to ensure that all of the Windows patches and applications are up to date.

There are already a few good walkthroughs on how to configure a new Windows Server 2012 R2 template, so I won’t cover that ground again.  One of my favorites can be found in this great article by Michael White.

While building or deploying your template, it is a good idea to not install any applications until after the Remote Desktop Session Host role has been installed.  Applications that are installed before the RDSH role is installed may not work properly.

Once you have your template built, or once you have deployed a new VM from an existing Windows template, we need to take the following steps to prepare the server to publish applications:

1. Connect into the new server using Remote Desktop

2. Launch the Server Manager

3. Click Manage –> Add Roles and Features

image

4. Click Next to go to the Installation Type screen

5. Select Role-based or feature based Installation and click Next

image

6. On the Server Selection page, click Next.  This will select the server that you’re currently logged into.

Note: It is possible to install and configure Remote Desktop Services remotely using Server 2012 or Server 2012 R2.  This can be accomplished using the Server Manager.

7. Check the box for the Remote Desktop Services role and click Next

image

8. Expand the .Net Framework 3.5 Features and check the .Net Framework 3.5 (includes .NET 2.0 and 3.0) box to select it.

Note: This step is not required for installing the RDSH role.  I like to install this feature now, before adding the RDSH role, because many applications still require .Net 3.5.

image

9. Scroll down to User Interfaces and Infrastructure and expand this list.

10. Check the box next to Desktop Experience. and click next.

Note: Desktop Experience is not required.image

11. Click Next to go to the Remote Desktop Role Services page.

12. Check the checkbox for Remote Desktop Session Host.  If prompted to install additional features, click Add Features and click Next to continue.

image

13. Click Install to being the Role and Feature installation.

14. Reboot the server when the installation has finished.

15. Once the installation is complete, open a Command Prompt as an administrator and enter: change user /install  .  This command puts the RDSH server into software installation mode.

image

16. Install any business or end-user applications.  Once you have completed installing any applications, enter: Change User /Execute.

Installing the Horizon Agent

The last step is to install the Horizon View Agent onto the Remote Desktop Services host.  The process for installing the agent is similar to installing it on a desktop virtual machine, but there are some differences in this process.

The steps for installing the View Agent are:

1. Double click the installer to launch it.

2. Click Next on the Welcome screen.

image

3. Accept the license agreement and click Next.

image

4. Select the options that you want to install and the directory to install to and click Next.

image

5. Enter the Fully Qualified Domain Name or IP address of a Connection Server in your environment in the textbox labeled Server.

If the account that you’re logged in with has permission to add the server to the View environment, select the “Authenticate as Current User” option, otherwise select “Specify Administrator Credentials” and provide an account with the correct permissions.  Click Next to continue.

image

6. Click Install to install the View Agent.

image

7. Click Finish when the installation has completed.

image

8. The server will prompt for a reboot.  Click Yes to reboot the server.

image

The agent will be completely installed when the reboot completes.  But the server will not be available in Horizon View just yet.  Before it can be used to publish applications, a Farm and an Application Pool need to be configured.

In the next post, we’ll go over how to set up a Farm inside of View Administrator.

Revisiting The Horizon View Start-Recompose Script #VDM30in30

Last September, I posted a script that I had written to address a few issues in the Horizon View environment that I managed at the time.  At the time, I had seven base images for sixteen desktop pools, and scheduling the Patch Tuesday recompose operations would take half the day if I had to do it manually in View Administrator.

After the script was posted, I learned that there were several issues with it.  While it had worked in the environment I originally wrote it for, I hadn’t properly documented all the parameters in the comment-based help.  This was causing odd failures when attempting to run the script.

A couple of weeks ago, I received an email from someone who was hoping to use the script in their environment.  They were experiencing issues with running the script, and after helping them with their issue, I decided to revisit the script and fix the issues.

The changes in this version of the script are:

  • Changed the way that the View LDAP database is queried so the Quest AD cmdlets are no longer required
  • Removed the Replica Parameter. The script will now detect the correct replica volume from the Pool settings
  • Renamed the View parameter to ConnectionServer to better describe what its for
  • Made the vCenter, ConnectionServer, and ParentVM parameters mandatory.
  • Fixed the comment-based help so all parameters are listed and examples provided.
  • Removed all email notification code from the script

You can download the latest version of the Start-Recompose PowerShell script from my Github site.

Licensing Your Home Lab #VDM30in30

One of the benefits of having a home lab is that you have your own environment to build and test workloads without impacting any corporate systems.  This is great for testing out techniques and ideas and furthering your own knowledge of various systems.

Licensing a home lab can be a challenge, though.  A good lab should, ideally, be representative of a production environment.  For many environments, that means running vSphere, Windows Server, and possibly other business applications like SQL Server.

Unless you have a deep bank account to buy commercial licenses or are accepted into a program that provides licensing, acquiring licenses for a home lab can be very tough.  The main source of licensing is time-limited trial licensing that requires the lab to be rebuilt every 60-180 days depending on the product.  Tools like AutoLab help greatly with this by automating the lab building process.

But what options are available for those who want a more stable lab that doesn’t need to be rebuilt frequently?  The options there are a little more limited. Details on those options are below:

  • Microsoft: The very low-cost TechNet subscriptions used to cover this ground, but years of abuse and a shifting focus towards cloud services led to this service being discontinued in September 2013.  The official replacement for TechNet was long-term evaluation software from the TechNet Evaluation Center.  If evaluations aren’t your cup of tea, there are two options:
    • MSDN Subscriptions: MSDN subscriptions offer licensed software that developers can use, and they had fewer restrictions than the TechNet subscriptions.  There are a variety of MSDN subscription options, and some include Visual Studio and all products in the Microsoft catalog.  The most affordable option for a Home Lab is the MSDN Operating Systems subscription which is $799 per year.
    • Microsoft Action Pack: The Microsoft Action Pack is a subscription option for registered small business partners that provides some licensed software products for internal use.  This subscription can include Office 365 product use rights.
    • Windows Server 2012 R2 Essentials – This is a lower-cost Windows Server license for one server up to 25 users.  The server running the essentials role would need to be the root domain controller in a domain with all the FSMO roles.  It also provides features to integrate with Microsoft Online Services such as Office 365.  If you use this option, you could have a core server without any time-limited licensing and utilize trials for other servers or services.
  • VMware:  VMware used to have a program similar to TechNet, but that was discontinued many years ago.  There are two options that home labs can take advantage of, though.
    • vSphere Free Hypervisor: A feature limited version of vSphere that cannot be managed by vCenter and has no writeable commandline access. 
    • vSphere Essentials: The Essentials kit includes vCenter and the vSphere Hypervisor for up to three hosts.  The cheapest version of this kit does not include vMotion or the other features of the regular commercial licensing tiers, but it does provide for licensed home lab software.
  • Linux Solutions: There are a number of Linux-based solutions that are free or very low cost.  There are Linux solutions that can provide similar functionality to Active Directory.

Deploying SQL Server Using WinRM #VDM30in30

A couple of weeks ago, I shared the scripts I use to prepare a brand new VM to run SQL Server.  At the time, I noted that I could only get up to the point where the server was ready for SQL and that I was unable to overcome some issues with installing SQL Server remotely.

I have finally found a way to get around those issues, and I’ve put together a script for remotely deploying SQL Server using PowerShell and WinRM.  This script is designed to be used as part of a workflow in vCenter Orchestrator that will allow admins and, eventually, developers to provision their own SQL Server instances.

There are two scripts that are required for this process, and they borrow techniques from the other provisioning scripts that I’ve written.  I would highly recommend reading my previous articles on provisioning a VM and preparing a VM for SQL Server before trying out these scripts.

The first script is the Install-SQLServer script that should be included with the SQL Server files that are copied to the new server.  This is the script that will run on the local machine and install SQL.

The other script is the script that will run on your jump box or scripting server called Invoke-SQLInstall.  In my environment, this script is executed on my scripting server by vCenter Orchestrator and invokes the SQL Server installation using WinRM on my new SQL Server.

Kerberos and SQL Server Installations

While I was building this script, I ran into a lot of issues when trying to get SQL Server to install remotely using WinRM.  The install would fail, and the setup log would point to an error that the account or the computer wasn’t trusted for delegation.

The Kerberos “Second Hop” issue was causing the install to fail, and most of the workarounds for getting around this issue, such as using Start-Process to launch a new PowerShell session or using a local batch file to install under other credentials, would not work inside of a WinRM session.

There is one other option that I had considered, but I didn’t pursue it at the time because I thought it was a security risk.

CredSSP

Microsoft introduced a new secruity delegation method years back to work around some of the limitations of Kerberos.  This new security delegation method,  called the Credential Security Service Provider or CredSSP for short, was designed specifically to address the Kerberos second hop issue.

The issue with CredSSP is that it can be configured to delegate credentials to any computer on the domain through group policy.  We don’t want or need that, and credentials should only be delegated to the computer that we’re working on for the short time that it will need them.

It is actually fairly easy to configure CredSSP on the SQL Server at runtime and to turn it off when we’re done, and the script will take care of both tasks when installing SQL Server.

Custom Roles

SQL Server has a number of roles and features that can be selected during installation.  Many of these roles have very specific functions and aren’t suited for general purpose database servers, and they shouldn’t be installed if you aren’t going to use them.

What makes this more complicated is that some features are instance specific, such as the database engine and Reporting Services, while others are not instance specific and only need to be installed once.

Since each instance and/or each SQL Server may need different features installed, the script was designed with roles in mind.  Each role  is an element in a PowerShell Switch statement that contains the SQL command-line installation string.   It may also contain other commands that might be needed such as the Windows Firewall cmdlets to allow incoming connections to the SQL instance.

This design choice allows the script to be flexible and adapt to the changing needs of the business and the environment.

Get the Scripts

The scripts are available on my Github page with the rest of my provisioning scripts.