Horizon 8.0 Part 7: Deploying Horizon Connection Servers

Connection Servers are one of the most important components in any Horizon environment, and they come in two flavors – the standard connection server and the replica connection server.

Connection Servers handle multiple roles in the Horizon infrastructure.  They handle primary user authentication against Active Directory, management of desktop pools, provide a portal to access desktop pools and published applications, and broker connections to desktops, shared hosted desktops, and published applications. 

When you run the Horizon installer, you will see two connection server types – the standard connection server and the replica connection server.  The Standard and Replica Connection Servers have the same feature set and perform identically after installation has completed.  The only difference between the two is that the standard connection server is the first server installed in the pod and initializes a new environment while a replica server copies data from a server in an existing environment.

Note: When you run the Connection Server installer, you will see a third role – the TrueSSO Enrollment Server role. This role is used to enable TrueSSO, which provides passwordless authentication to desktops in conjunction with VMware Workspace ONE Access.  That role will not be covered at this time.

In previous versions of Horizon, there was another connection server role – the Security Server.  The Security Server is a stripped down version of the regular Connection Server designed to provide secure remote access.  The Security Server was discontinued in Horizon 8, and it has been replaced by the Unified Access Gateway.

Architecture and Concepts

Before we go through the steps to deploy a Horizon Connection Server, let’s cover some basic architecture and concepts around Connection Servers.

VMware uses the “pod and block” concept to describe the basic Horizon architecture. A pod is a cluster of Horizon connection servers. Pods can scale out to 7 connection servers supporting up to 10,000 user sessions. Horizon uses Microsoft Active Directory Lightweight Directory Services (AD LDS, formerly ADAM) as it’s primary datastore. The AD LDS instance contains all of the common configuration for the Horizon pod, such as vCenter information, Instant Clone AD provisioning accounts, and pool configuration and entitlements. Each connection server in the pod has a local copy of the AD LDS instance.

All connection servers in the pod must be in the same physical datacenter, and Cloud Pod Architecture must be used if a multi-site deployments are required. VMware does not support Horizon deployments where connection servers in the same pod are spread across sites. This includes sites where active-active storage technologies are used, including technologies like VPLEX and Stretched VSAN. If active-active storage technologies are used, the Horizon management components must all be pinned to one site. They can manage desktops that are deployed into the other site, but all of the connection servers must be located together.

There are two reasons for this – the AD LDS instance mentioned above and the message bus technology used for communications between the connection servers. AD LDS can be prone to split-brain and USN rollback issues in the event of a network or server outage, especially if a server is operating on it’s own or restored from a backup or snapshot. These can prevent servers from replicating data and resolving replication conflicts when two connection server have different , which will impact the stability and operation of the environment.

Horizon uses Java Message Bus for communications between the desktops, and this requires extremely low latency (sub-millisecond) to ensure that all connection servers are in sync. If the connection servers are not in sync, then there may be errors where two users may have the same floating desktop assigned which will lead to errors. Simon Long has a great blog post explaining this in more detail.

In the Horizon block and pod architecture, blocks are the vSphere resources that desktops and RDSH servers will run on. A block is a vCenter servers for management and one or more ESXi hosts or clusters for running virtual machines. A Horizon deployment can have one or more resource blocks. The management components can along side desktop or RDSH resources, but this is not recommended for most deployments.

Note: While the Horizon connection servers must be located together in the same site, the desktop resources do not need to be located in the same site as the Connection Servers.

Installing the First Connection Server

Before you can begin installing the Horizon Connection Server, you will need to have a server prepared that meets the minimum requirements. The basic requirements, which are described in Part 2, are a server running Server 2012 R2 or later with 2 CPUs and at least 4GB of RAM.

Note:  If you are going have more than 50 virtual desktop sessions on a Connection Server, it should be provisioned with at least 10GB of RAM.

Once the server is provisioned, and the Connection Server installer has been copied over, the steps for configuring the first Connection Server are:

1. Launch the Connection Server installation wizard by double-clicking on VMware-viewconnectionserver-x86_64-8.x.x-xxxxxxx.exe.

2. Click Next on the first screen to continue.

3.  Accept the license agreement and click Next to continue.

4.  If required, change the location where the Connection Server files will be installed and click Next.

5. Select the type of Connection Server that you’ll be installing.  For this section, we’ll select the Horizon Standard Server.  If you plan on allowing access to desktops through an HTML5 compatible web browser, make sure that “Install HTML Access” is installed. This option should be enabled by default.  Select the IP protocol that will be used to configure the Horizon environment.  Click Next to continue.

If you are installing a standard server to create a new pod, please skip to step 6. If this is a replica server to expand an existing pod, please see Step 5a.

5a – Applies only to Replica Servers. If you are installing a Horizon Replica Server, you will be prompted to provide the IP address or host name of another server in the pod. This is the server that the AD LDS instance will be replicated from.

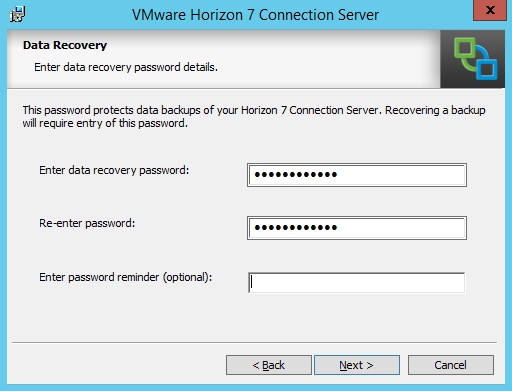
6. Enter a strong password for data recovery.  This will be used if you need to restore the Connection Server’s LDAP database from backup.  Make sure you store this password in a secure place.  You can also enter a password reminder or hint, but this is not required.

7. Horizon requires a number of ports to be opened on the local Windows Server firewall, and the installer will prompt you to configure these ports as part of the installation.  Select the “Configure Windows Firewall Automatically” to have this done as part of the installation.

Note: Disabling the Windows Firewall is not recommended. 

8. The installer will prompt you to select the default Horizon environment administrator.  The options that can be selected are the local server Administrator group, which will grant administrator privileges to all local admins on the server, or to select a specific domain user or group.  The option you select will depend on your environment, your security policies, and/or other requirements.

If you plan to use a specific domain user or group, select the “Authorize a specific domain user or domain group” option and enter the user or group name in the “domainname\usergroupname” format.

Note: If you plan to use a custom domain group as the default Horizon administrator group, make sure you create it and allow it to replicate before you start the installation. 

9.  Chose whether you want to participate in the User Experience Improvement program.  If you do not wish to participate, just click Next to continue.

10. If you are installing into an SDDC on a public cloud, such as VMware Cloud on AWS, select the cloud service from the drop down box. Otherwise, select General. Click Install to begin the installation.

11. The installer will install and configure the application and any additional windows roles or features that are needed to support Horizon.

12. The installer will wait for the Horizon web apps to start.

13. Once the install completes, click Finish.  You may be prompted to reboot the server after the installation completes.

Configuring the Locked.Properties file

Before you sign into Horizon Administrator to configure the environment or allowing users to connect to a new connection server in an existing pod, a configuration change needs to be made.

Horizon is configured to perform origin checking on all incoming connections. This can prevent users from accessing the HTML5 client and admin interface through a load balanced URL or the Unified Access Gateway. This KB explains the issue in more detail.

In order to properly configure Horizon, we will need to create a file called locked.properties on the connection server. The locked.properties file is a simple text file, and it needs to be created in C:\Program Files\VMware\VMware View\Server\sslgateway\conf.

The steps for configuring HTML client access when using load balanced connection servers can be found in the VMware documentation here, and the steps for configuring HTML client access when using the Unified Access Gateway can be found here. Depending on your environment, one or both of the articles may apply, and these changes must be applied to each connection server in the pod.

The connection server services will need to be restarted after the changes have been made.

Origin checking is not the only thing the locked.properties file is used for. This file is used to control the behavior of the web server used with Horizon. You can learn more about the Cross-Origin Resource Sharing options used in the locked.properties file here.

Note: The locked.properties file is also used for configuring HTTP settings, Smart Card Access, and other features of the web server used by Horizon. Please see the Horizon documentation at docs.vmware.com for more details.

Now that the Connection Server is installed, it’s time to begin configuring the Horizon application so the Connection Server can communicate with vCenter as well as setting up any required license keys and the events database.  Those steps will be covered in the next part.

Horizon REST API Library for .Net

So…there is a surprise second post for today. This one is a short one, and if you’ve been interested in automating your Horizon deployment, you will like this.

One of the new features of Horizon 2006 is an expand REST API. The expanded REST API provides administrators with the ability to easily automate pool management and entitlement tasks. You can learn more about the REST API by reviewing the Getting Started guide on Techzone, and you can browse the entire API on VMware Code.

Adopting this API to develop applications for Horizon has gotten easier. Andrew Morgan from the VMware End User Computing business unit has developed a .Net library around the Horizon Server REST API and released it on Github. This library supports both .Net 4.7 and .Net Core. The Github repo includes code samples for using the library with C# and Visual Basic.

I’m excited to see investment in this REST API as it will help customers, partners, and the community build applications to enhance and extend their Horizon deployments.

Determining Features Installed in the Horizon Agent or Windows Client

Let’s say you have a desktop pool or RDSH Farm.  You want to try out something in Horizon that requires a change to the Agent or Client, but you can’t remember if it’s been installed.  You could reinstall the agent or client to make sure the component you need is there.  But that’s a lot of manual work.

Thanks to a tip from a couple of my colleagues, including William Uhlig and Dan Berkowitz, there is an easier way to see what was installed with the Horizon Agent.  You can just check a registry key.

Inside your virtual desktops and RDSH servers, there is a registry key that shows all of the features available in the Horizon agent and whether they are available locally.  This registry key is located at HKEY_LOCAL_MACHINE\Software\VMware, Inc.\Installer\Features_HorizonAgent

Reg1

As you can see in the attached screenshot, features that are available have a value of “Local.”  Features that aren’t available, ie those that were not installed, as listed as being “Absent.”

There is also a registry key that shows installed features for the Horizon Client on Windows.  Horizon has a single installer that is used for both 32-bit and 64-bit Windows, so the location of this key will depend on what version of Windows you have installed. The path for this registry key on a 64-bit machine is HKEY_LOCAL_MACHINE\SOFTWARE\WOW6432Node\VMware, Inc.\VMware VDM\Client\Installer\.

Inside this registry key, there will be a key named with a GUID. The contents of this field contain the list of features that are installed in the Windows Horizon Client. Unlike the Agent install key, it uses a binary value to denote if a feature is installed instead of “local” or “absent.” The Horizon Client has fewer installable options compared to the agent, and the only optional item that does not appear in this key, at least in a default installation, is URL Content Redirection. This feature require a command-line switch to enable in the Horizon Client installer.

Horizon 8.0 Part 6: Service Accounts and Databases

Back in Part 4, I mentioned that Horizon required up to a few service accounts to function properly.  One of these accounts is for accessing vCenter to provision and manage the virtual machines that users will connect to.  The other service account will manage computer accounts within Active Directory, and this account is only required if you are using Instant Clones.

Horizon 8 utilizes a single database for storing event and auditing data generated by the platform. This database is optional, but it is highly recommended. Horizon supports running the event database on Microsoft SQL Server and Oracle, and you can find the specific supported versions in the VMware Product Interoperability Matrix. This post will cover setting up the event database on Microsoft SQL Server.

It’s important to build the Active Directory service accounts and database access accounts with the principle of least privileged access in mind.  These accounts should not have more rights than they would need.  So while the easy way out would be to give these accounts vCenter Administrator, Domain Administrator, and SQL Server or Oracle SysAdmin rights, it would not be a good idea as these accounts could potentially be compromised.

vCenter Service Account

The first account that needs to be created is a service account that Horizon will use for accessing vCenter.  Horizon uses this account for virtual machine management tasks, including provisioning new virtual desktops and RDSH servers and performing power operations.  The service account can either be an Active Directory user or a local vCenter user. When installing Horizon in an on-premises environment, I prefer to use a standard Active Directory domain user account without any additional administrator-level rights on the domain or on the vCenter server.

There are a couple of different ways to configure your Horizon environment, so the actual rights required in vCenter will vary.  The specific permissions that are required can be found in the Configuring User Accounts for vCenter Access section of the Horizon documentation..

A new role will need to be created within vCenter in order to assign the appropriate permissions.  To create a new role in the vCenter Web Client, you need to go to Administration –> Roles from the main page.  This will bring up the roles page, and we can create a new role from here by clicking on the green plus sign.

2013-12-29_19-14-37

For the purposes of this walkthrough, I’ll be setting up my service account with permissions to deploy Instant Clone desktops.  These permissions will also support deploying Full Clone desktops.  The permissions that need to be assigned to our new role are:

Privilege Group Privilege
Cryptographic Operations Cryptographic Operations permissions are required if you use Instant Clones with virtual Trusted Platform Module Devices

Clone

Decrypt

Direct Access

Encrypt

Manage KMS

Migrate

Register Host

Datastore Allocate Space

Browse Datastore

Low Level File Operations

Folder Create Folder

Delete Folder

Global Act as vCenter Server*

Enable Methods

Disable Methods

Manage Custom Attributes

Set Custom Attribute

System Tag

*Required for View Storage Accelerator

Host Inventory

·         Modify Cluster

Network All Permissions
Profile Driven Storage All Permissions Required if using VSAN or Virtual Volumes
Resource Assign virtual machine to resource pool
Storage Views View
Virtual Machine Configuration

·         All Permissions

Interaction

·         Device Connection

·         Perform Wipe or Shrink Operations

·         Power Off

·         Power On

·         Reset

·         Suspend

Inventory

·         All Permissions

Provisioning

·         Allow Disk Access

·         Clone Template

·         Clone Virtual Machine

·         Customize

·         Deploy Template

·         Read Customization Specification

Snapshot Management

·         All Permissions

After the role has been created, we will need to assign permissions for our vCenter Server service account to the root object in vCenter.  This is the vCenter Server object at the top of the tree.  To do this from the roles screen, you will need to go back to the vCenter Web Client Home screen and take the following steps:

  1. Select vCenter
  2. Select vCenter Servers under Inventory Lists
  3. Select the vCenter that you wish to grant permissions on
  4. Click on the Manage Tab
  5. Click Permissions
  6. Click the Green Plus Sign to add a new permission
  7. Select the role for Horizon Composer
  8. Add the Active Directory Domain User or local vCenter user who should be assigned the role
  9. Click OK.

2013-12-29_20-33-59

Horizon Events Database Account

The Events Database is a repository for all events that happen within the Horizon environment.  Some examples of events that are recorded in the database include logon and logoff activity, an audit trail of administrator activities, and desktop provisioning errors.

The Events Database requires a Microsoft SQL Server or Oracle database server, and it should be installed on an existing production database server.  There are two parts to configuring the events database.  The first part, creating the database and the database user, needs to be done in SQL Server Management Studio before the event database can be configured in Horizon Administrator.  The steps for configuring Horizon to use the Events database will happen in another post.

Note: Horizon also supports sending event data off to a syslog server.  This can be used in place of an events database.  Configuring a syslog server is beyond the scope of this article.

When setting up a Horizon Event Database on Microsoft SQL Server, SQL Server Authentication needs to be enabled.  Horizon uses JDBC, and Windows Authentication cannot be used with the event database.

To set up the database, follow these steps:

1. Open SQL Server Management Studio and log in with an account that has permissions to create users and databases.

2. Expand Security –> Logins.

3. Right-click on Logins and Select New Login…

1. Create New User 1

4. Enter the SQL Login Name and Password and then click OK.

2. Create New User 2

5. Expand Databases.

6. Right-click on Databases and select New Database.

7. Enter the database name.  Select the database user that you created above as the database owner.  Click OK to create the database.

3. Create View Events Database

Note: SQL Server named instances are configured to use dynamic ports.  This means that SQL Server will use a new port every time the server is restarted.  The events database does not support dynamic ports, so a static port will need to be configured and the SQL instance restarted prior to configuring the events database in Horizon.  For instructions on how to configure a static ports in SQL Server, please see this article.

We have now created the shell of the database.  It is empty now, and all of the tables will be created when we configure the event database in Horizon in a future step.

Active Directory Provisioning Account

The Active Directory Provisioning Service account is used by Horizon to manage the computer accounts that are created for Instant Clone desktops.

This account can be created as a standard domain user, and it should not have domain administrator or account operator rights – it only needs a select group of permissions on the OU (or OUs) where the virtual desktop computer accounts will be placed.

After this account has been created, you need to delegate permissions to it on the OU (or OUs) where your VDI desktops will be placed.  If you use the structure like the one I outlined in Part 4, you only need to delegate permissions on the top-level OU and permission inheritance, if turned on, will apply them to any child or grandchild objects beneath it.

Note:  If inheritance is not turned on, you will need to check the Apply to All Child Objects checkbox before applying the permissions.

The permissions that need to be delegated on the OU are:

  • List Contents
  • Read All Properties
  • Write All Properties
  • Create Computer Objects
  • Delete Computer Objects
  • Read Permissions
  • Reset Password

Note: Although granting this account Domain Administrator or Account Operator permissions may seem like an easy way to grant it the permissions it needs, it will grant a number of other permissions that are not needed and could pose a security risk if that account is compromised.  Only the required permissions should be granted in a production environment.

This wraps up all of the prerequisites for the environment.  In the next couple of sections, I will be covering the installation and configuration of VMware Horizon.

Horizon 8.0 Part 5: SSL Certificates

SSL certificates are an important part of all Horizon environments .  They’re used to secure communications from client to server as well as between the various servers in the environment.  Improperly configured or maintained certificate authorities can bring an environment to it’s knees – if a connection server cannot verify the authenticity of a certificate – such as an expired revocation list from an offline root CA, communications between servers will break down.  This also impacts client connectivity – by default, the Horizon client will not connect to Connection Servers, Security Servers, or Access Points unless users change the SSL settings.

Most of the certificates that you will need for your environment will need to be minted off of an internal certificate authority.  If you are using a security server to provide external access, you will need to acquire a certificate from a public certificate authority.  If you’re building a test lab or don’t have the budget for a commercial certificate from one of the major certificate providers, you can use a free certificate authority such as Let’s Encrypt or a low-cost certificate provider such as NameCheap.

Prerequisites

Before you can begin creating certificates for your environment, you will need to have a certificate authority infrastructure set up.  Microsoft has a great 2-Tier PKI walkthrough on TechNet.

Note: If you use the walkthrough to set up your PKI environment., you will need to alter the configuration file to remove the  AlternateSignatureAlgorithm=1 line.  This feature does not appear to be supported on vCenter  and can cause errors when importing certificates.

Once your environment is set up, you will want to create a template for all certificates used by VMware products.  Derek Seaman has an older, but good, walkthrough on creating a custom VMware certificate template.

Note: Although a custom template isn’t required, I like to create one per Derek’s instructions so all VMware products are using the same template.  If you are unable to do this, you can use the web certificate template for all Horizon certificates.

Creating The Certificate Request

Horizon 8/2006 handles certificates on the Windows Server-based components the same way as previous versions of Horizon.  Certificates are stored in the Windows certificate store, so the best way of generating certificate requests is to use the certreq.exe certificate tool.  This tool can also be used to submit the request to a local certificate authority and accept and install a certificate after it has been issued.

Certreq.exe uses a custom INF file to create the certificate request.  This INF file contains all of the parameters that the certificate request requires, including the subject, the certificate’s friendly name, if the private key can be exported, and any subject alternate names that the certificate requires.

Modern browsers now require certificates to include at least one subject alternative name or they will treat the certificate as insecure. I highly recommend reviewing this article from Microsoft.  It goes over how to create a certificate request file for SAN certificates.

Your certificate request should include subject alternative names for the DNS name, fully-qualified domain name, and any load-balanced DNS name that users might use to access the system.

A  certificate request inf file that you can use as a template is below.  To use this template, copy and save the text below into a text file, change the file to match your environment, and save it as a .inf file. If you plan to use this file in your environment, please be sure to update the subject, any subject alternative names you plan to include on the certificate, and the certificate template at the bottom of the request to match the details of your environment.

;----------------- request.inf -----------------
[Version]

Signature="$Windows NT$"

[NewRequest]

Subject = "CN=<Server Name>, OU=<Department>, O=<Company>, L=<City>, S=<State>, C=<Country>" ; replace attribues in this line using example below
KeySpec = 1
KeyLength = 2048
; Can be 2048, 4096, 8192, or 16384.
; Larger key sizes are more secure, but have
; a greater impact on performance.
Exportable = TRUE
FriendlyName = "vdm"
MachineKeySet = TRUE
SMIME = False
PrivateKeyArchive = FALSE
UserProtected = FALSE
UseExistingKeySet = FALSE
ProviderName = "Microsoft RSA SChannel Cryptographic Provider"
ProviderType = 12
RequestType = PKCS10
KeyUsage = 0xa0

[EnhancedKeyUsageExtension]

OID=1.3.6.1.5.5.7.3.1 ; this is for Server Authentication

[Extensions]

2.5.29.17 = "{text}"
_continue_ = "dns=<DNS Short Name>&"
_continue_ = "dns=<Server FQDN>&"
_continue_ = "dns=<Alternate DNS Name>&"

[RequestAttributes]

CertificateTemplate = VMware-SSL

;-----------------------------------------------

Note: When creating a certificate, the state or province should not be abbreviated.  For instance, if you are in Wisconsin, the full state names should be used in place of the 2 letter state postal abbreviation.

Note:  Country names should be abbreviated using the ISO 3166 2-character country codes.

Certreq.exe is typically run from the command line, and it requires administrative permissions to perform certificate operations.

The command the generate the certificate request that you can submit to your CA using the INF file is below. This will generate a new certificate request with a private key that is stored in the Windows Certificate Store.

certreq.exe –New <request.inf> <certificaterequest.req>

Submitting the Certificate Request

Once you have a certificate request, it needs to be submitted to the certificate authority.  The process for doing this can vary greatly depending on the environment and/or the third-party certificate provider that you use.

If your environment allows it, you can use the certreq.exe tool to submit the request and retrieve the newly minted certificate.  The command for doing this is:

certreq –submit -config “<ServerName\CAName>” “<CertificateRequest.req>” “<CertificateResponse.cer>

If you use this method to submit a certificate, you will need to know the server name and the CA’s canonical name in order to submit the certificate request.

Accepting the Certificate

Once the certificate has been generated, it needs to be imported into the server.  The import command is:

certreq.exe –accept “<CertificateResponse.cer>

This will import the generated certificate into the Windows Certificate Store.

Using the Certificates

Now that we have these freshly minted certificates, we need to put them to work in the Horizon environment.  There are a couple of ways to go about doing this.

1. If you haven’t installed the Horizon Connection Server components on the server yet, you will get the option to select your certificate during the installation process.  You don’t need to do anything special to set the certificate up.

2. If you have installed the Horizon components, and you are using a self-signed certificate or a certificate signed from a different CA, you will need to change the friendly name of the old certificate and restart the Connection Server.

Horizon requires the Connection Server certificate to have a friendly name value of vdm.  The template that is posted above sets the friendly name of the new certificate to vdm automatically, but this will conflict with any existing certificates.

1
Friendly Name

The steps for changing the friendly name are:

  1. Go to Start –> Run and enter MMC.exe
  2. Go to File –> Add/Remove Snap-in
  3. Select Certificates and click Add
  4. Select Computer Account and click Finish
  5. Click OK
  6. Right click on the old certificate and select Properties
  7. On the General tab, delete the value in the Friendly Name field, or change it to vdm_old
  8. Click OK
  9. Restart the Horizon service on the server

2

At this point, all of your certificates should be installed.  If you open up the Horizon Administrator web page, the dashboard should have all green lights.  If you do not see all green lights, you may need to check the health of your certificate environment to ensure that the Horizon servers can check the validity of all certificates and that a CRL hasn’t expired.

If you are using a certificate signed on an internal CA for servers that your end users connect to, you will need to deploy your root and intermediate certificates to each computer.  This can be done through Group Policy for Windows computers, deploying through Workspace ONE or other endpoint management solution, or by publishing the certificates in the Active Directory certificate store.  If you’re using Teradici PCoIP Zero Clients, you can deploy the certificates as part of a policy with the management VM.  If you don’t deploy the root and intermediate certificates, users will not be able to connect without disabling certificate checking in the Horizon client.

Unified Access Gateway Certificates

Unlike the Connection Server, the Unified Access Gateway does not run on Windows.  It is a Linux-based virtual appliance. While you might think that this make certificate management more challenging, it has been streamlined over the last few UAG releases to make it very easy. Administrators can install separate certificates for the external interface and the internal management interface during or after deployment.

The UAG certificates can be generated using Windows or OpenSSL. Be sure to include all subject alternative names in your request. Once your certificate is generated, you will either need to create a PFX file or have a copy of the private key and the certificate chain to install on the appliance.

The UAG certificates can be installed during the appliance deployment as part of the PowerShell deployment method, or they can be installed manually through the appliance management interface after the deployment is completed.

UAG certificates will be covered in greater detail when we get to the UAG section of this series.

In the next post, we’ll talk about databases and service account.

Horizon 8.0 Part 4: Active Directory Design Considerations

Traditionally, virtual desktops run Windows, and the servers that provide the virtual desktop infrastructure services also run on Windows.  Because of the heavy reliance on Windows, Active Directory plays a huge role in Horizon environments.  Even Linux desktops can be configured for Active Directory and utilize the Horizon user’s AD credentials for Single Sign-On.

When you’re planning a new Horizon deployment, or re-architecting an existing deployment, the design of your Active Directory environment is a critical element that needs to be considered.  How you organize your virtual desktops, templates, and security groups impacts Group Policy, helpdesk delegation rights, and Horizon Instant Clones and RDSH.

Some Active Directory objects need to be configured before any Horizon components are installed.  Some of these objects require special configuration either in Active Directory or inside vCenter.  The Active Directory objects that need to be set up are:

  • An organizational unit structure for Horizon Desktops and desktop templates
  • Basic Group Policy Objects for the different organizational units
  • An organization unit for Microsoft RDS servers if published apps or RDSH-desktops are deployed
  • In large environments with multiple sites and/or trusted domains, ensure that sites and services are set up properly to enable Horizon to properly locate domain controllers

Optionally, you may want to set up an organizational unit for any security groups that might be used for entitling access to the Horizon desktop pools.  This can be useful for organizing those groups and/or delegating access to Help Desk or other staff who don’t need Account Operator or Domain Administrator rights.

Horizon and Active Directory

Before I talk about creating Organizational Unit structures and Group Policy, I want to start with Active Directory architecture and how Horizon utilizes Active Directory.  I recently wrote about that here, so I won’t go too deep into that topic.  But I will recap a few things to keep in mind.

Horizon utilizes the DCLocator function that is built into the Windows Server NetLogon process.  This process utilizes DNS to identify server locator records that correspond to the Active Directory site the server is located in.

Sites and Services need to be set up properly in multisite environments.  This means that you need to create sites in AD Sites and Services, ensure that your subnets are mapped to the proper sites, and create site links for your replication topology so that Horizon can locate the closest domain controllers.

There are additional considerations around site naming when working in a multi-forest environment where domains are connected by a trust.

To learn more about Horizon and Active Directory, please see my deep dive post on the topic here.

Creating an Organizational Unit Structure for Horizon Desktops

One of the first things that we need to plan and prepare before deploying desktops is an Active Directory organizational unit structure for Horizon desktops.  This OU structure will hold all of the desktops created and used by Horizon.

A separate OU structure within your Active Directory environment is important because you will want to apply different group policies to your Horizon desktops than you would your regular desktops.  There are also specific permissions that you will need to delegate to the Horizon Instant Clone Administrator service account.

Before I go into a method of organizing Active Directory, I want to make one thing clear.  There is no one way to organize Active Directory for Horizon.  These are guidelines that I like to follow because this organization makes sense to me.  These guidelines should be modified to fit your environment and your business and technical requirements.  There are a few things I highly recommend, though:

  • A dedicated Organizational Unit tree for Virtual Deskops
  • A dedicated Organizational Unit tree for RDSH Servers
  • Creating new Group Policy Objects for virtual desktops and RDSH Servers instead of applying your standard desktop/server GPOs to these objects

My preferred organizational method looks like this:

2013-12-28_21-55-14

View Desktops is a top-level OU (ie – one that sites in the root of the domain).  I like to set up this OU for two reasons.  One is that is completely segregates my VDI desktops from my non-VDI desktops and servers.  The other is that it gives me one place to apply group policy that should apply to all VDI desktops.

I create three child OUs under the View Desktops OU to separate persistent desktops, non-persistent desktops, and desktop templates.  This allows me to apply different group policies to the different types of desktops.  For instance, you may want to disable Windows Updates and use Dynamic Environment Manager on non-persistent desktops but allow Windows Updates on the desktop templates or Persistent Desktops.

You don’t need to create all three OUs.  If your environment consists entirely of Persistent desktops, you don’t need an OU for non-persistent desktops.  The opposite is true as well.  You may also choose to create more OUs depending on your organization.  For instance, you may create OUs based business groups, regions or geography, or other ways.

Finally, I tend to create use-case specific OUs for pools that require additional Group Policy options above and beyond the top-level. These grandchild OUs are completely optional.  If there is no need to set any custom policy for a specific use case, then they don’t need to be created.  However, if a grandchild OU is needed, then an entire pool will need to be created as desktop pools are assigned to OUs.  Adding additional pools can add management overhead to a VDI environment.

I’ve found that there is less of a need for these use-case specific OUs as I’ve learned more about modern UEM tools like Dynamic Environment Manager.  These tools can be a scalpel that allow administrators to dynamically apply context-aware policies and settings to specific users or groups without having to create additional pools or OUs for Group Policy configurations.

Creating an Organizational Unit for RDS Servers

RDSH servers need to be handled differently than virtual desktops.  They’re managed differently than your virtual desktops..

If application remoting or multi-user desktops are going to be deployed, an organizational unit for RDS servers should be created.  This can be a child OU of a server organizational unit, but it may not be the best place.

If full clone or manually provisioned RDSH servers are being used, you may want to consider creating a maintenance OU.  RDSH servers are often heavily locked down to block Windows Updates, software installers, and access to administrative tools and the command prompt through Group Policy.  A maintenance OU would be an OU where these policies are not enforced, allowing admins access to these tools after a reboot to perform maintenance tasks.

One key thing to keep in mind is that server GPOs can be restrictive in some organizations, and they may conflict with applications or process that run in the RDSH server.  If RDSH is new to your environment, it’s important that the security and server teams understand that even though these are virtual machines running a server OS, they are being used like desktops to run applications.  Less restrictive server policies may be required.

Horizon Group Policy Objects

Horizon contains a number of custom group policy objects that can be used for configuring the Horizon agent features and optimizing the PCoIP and Blast protocols. The templates are available in the Horizon Extras bundle on My VMware.

The templates are distributed in ADMX format, and they can be placed in the Group Policy Central Store.

Horizon Service Accounts

Horizon requires a service account for accessing vCenter to provision new virtual machines.  If Instant Clones are used, a second service account will be needed to create computer accounts in Active Directory for managing computer accounts for the clones.  I will cover setting up those account in a future section.

In the next section, I’ll cover SSL certificates for Horizon servers.

Horizon 8.0 Part 3: Design Considerations

Whether it is Horizon, XenDesktop, or a cloud-based Desktop-as-a-Service provider, the implementation of a virtual desktop and/or published applications environment requires a significant time investment during the design phase.  If care isn’t taken, the wrong design could be put into production, and the costs of fixing it could easily outweigh the benefits of implementing the solution.

So before we move into installing the actual components for a Horizon environment, we’ll spend the next two posts on design considerations.  This post, Part 3, will discuss design considerations for the Horizon virtual desktops, and Part 4 will discuss design considerations for Active Directory.

Before I begin, designing an infrastructure to support a virtual desktop environment is a complex process. I couldn’t do it justice in one blog post. This post will provide an overview of the topic and help you understand all of the considerations that go into designing an environment. If you want to learn more about the art and science of designing VDI environments, I highly recommend The VDI Design Guide by Johan van Amersfoort.

Virtual Desktop Design

Virtual desktop environments are all about the end user and what they need.  So before you go shopping for storage arrays and servers, you need to start looking at your desktops.

Typically, when people think about desktop design, the first thing they think about is what provisioning engine they want to use. This is not the place to start. However, since this is one of the things that people want to know more about, I’ll start by discussing the provisioning methods in Horizon.

There are four methods for provisioning desktops in Horizon 2006:

  • Full Clone Desktops – Each desktop is a full virtual machine deployed from a template and managed as an independent virtual machine.
  • Instant Clone Desktops – Instant Clone desktops are new to Horizon 7, and they are built off of the VMfork technology introduced with vSphere 6.0.  Instant Clones are essentially a rapid clone of a running virtual machine with extremely fast customization.
  • Remote Desktop Session Host Pools – Horizon 6 expanded RDSH support to include PCoIP support and application remoting.  When RDSH desktops and/or application remoting are used, multiple users are logged into servers that host user sessions.  This feature requires Server 2012 R2 or newer with the RDSH features enabled.
  • Manually Provisioned Desktops – Manually provisioned desktops are desktop or published app resources that are provisioned outside of Horizon. These can be virtual machines that are managed by vCenter, or unmanaged physical or virtual machines.

I didn’t mention Linked Clones here. While Linked Clones are still available in Horizon 8, they have been officially deprecated, and Composer is slated to be removed in a future release. Instant Clones are the replacement for Linked Clones, and they are available in all Horizon 8 SKUs. If you currently use Linked Clones, you will want to transition to Instant Clones, and if you are starting a new project, you should not consider Linked Clones if you are using Horizon 8.

Desktops are more than just how they are provisioned. There are also options for how the desktops get assigned to users.

There are two desktop assignment types for desktop pools:

  • Dedicated Assignment – users are assigned to a particular desktop during their first login, and they will be logged into this desktop on all subsequent logins.
  • Floating Assignment – users are temporarily assigned to a desktop on each login.  On logout, the desktop will be available for other users to log into.  A user may not get the same desktop on each login.

As I mentioned above, there is a lot more to desktop design than the provisioning and assignment method. It also involves the VM specifications, applications, peripherals, and other attributes of the desktop environment. In fact, these attributes may determine what provisioning methods are available to you.

Understanding Use Cases

When you design a virtual desktop environment, you have to design around the use cases.  Use cases are the users, applications, peripherals, and how they are used to complete a task, and they are used to define many of the requirements in the environment.  The requirements of the applications in the type of desktops that are used and how they are assigned to users.

Unless you have some overriding constraints or requirements imposed upon your virtual desktop project, the desktop design choices that you make will influence and/or drive your subsequent purchases.   For instance, if you’re building virtual desktops to support CAD users, blade servers aren’t an option because high-end graphics cards will be needed, and if you want/need full clone desktops, you won’t invest in a storage array that doesn’t offer deduplication.

Other factors that may impact the use cases or the desktop design decisions include existing management tools, security policies, and other policies.

The Importance of Desktop Assessments

So how do you define your use cases? What information do you need, and how do you collect it?

The knowledge of who the users are collectively, the applications and peripherals they use, and how often they use them may exist in the organization, but there is a good chance that this information is tribal knowledge, outdated, and may be missing key details.

This is where desktop assessments come in. A desktop assessment is a process that gathers information about the environment to assist in defining use cases and sizing requirements for an environment.

The assessment starts by deploying an application in the environment. This typically consists of a server or virtual appliance that processes data and an agent that is deployed on endpoints. The tool runs for at least 30 days to gather information from a full business cycle.

When the assessment is complete, you will have detailed information about the application and resource usage, which will help determine the virtual desktop sizing and, later in the project, the physical infrastructure requirements.

Putting Together a High Level Design

Once you have determined your use cases, completed a desktop assessment and understand the impacts that these have on the desktop design, you’ll be able to put together a design document with the following items:

  • Use Case definition, which includes the applications, peripherals, and other aspects of the user environment.

The use case definitions will then determine other aspects of the environment, including:

  • Desktop definition based on the assessment data
  • Number of parent images that need to be managed
  • Number and type of desktop pools
  • Number of desktops per pool
  • Number of Connection Servers and Unified Access Gateways that are required

If you’re following the methodology that VMware uses in their design exams, your desktop design document should provide you with your conceptual and logical designs.

The conceptual and logical designs, built on details from the use cases, will influence the infrastructure design.  This phase would cover the physical hardware to run the virtual desktop environment, the network layer, storage fabric, and other infrastructure services such as antivirus.

The desktop design document will have a heavy influence on the decisions that are made when selecting components to implement Horizon 7.  The components that are selected need to support and enable the type of desktop environment that you want to run.

Before moving onto the next section, I want to reiterate the importance of doing a desktop assessment. The assessment will provide you with the information you need to properly design the environment, and it will avoid costly mistakes.

In part four, we will cover Active Directory design for Horizon environments.

Horizon 8.0 Part 2: Horizon Requirements

In order to deliver virtual desktops to end users, a Horizon environment requires multiple components working together in concert.  Most of the components that Horizon relies upon are VMware products, but some of the components, such as the database and Active Directory, are 3rd-party products.

The Basics

The smallest Horizon environment only requires three components to deliver a remote desktop session to end users: a desktop, a View Connection Server, and Active Directory.  Technically speaking, you do not need vCenter or ESXi as the Horizon agent can be installed on physical desktops.

Many environments, though, are built on vSphere, and the virtual infrastructure for this type of environment doesn’t need to be anything special.  For small proof of concepts or upgrade testing, one server with direct attached storage and enough RAM could support a few users.

All Horizon environments, from the simple one above to a complex multi-site Cloud Pod environment, are built on this foundation.  The core of this foundation is the View Connection Server.

Connection Servers are at the core of a Horizon environment.  They handle desktop provisioning, user authentication and broker user sessions to desktops.  They manage connections to multi-user desktops and published applications.

There are three roles that can be installed using the Connection Server installer, and all three roles have the same requirements.  These roles are:

  • Standard Connection Server – The first Connection Server installed in the environment.
  • Replica Connection Server – Additional Connection Servers that replicate from the standard connection server
  • Enrollment Server – The Enrollment Server was introduced in Horizon 7.  role is used to facilitate the new True SSO feature in conjunction with Workspace ONE Access and a local certificate authority.

The requirements for a Connection Server are:

  • 1 CPU, 4 vCPUs recommended
  • Minimum 4GB RAM, 10GB recommended if 50 or more users are connecting
  • Windows Server 2012 R2 or newer
  • Joined to an Active Directory domain
  • Static IP Address

Note: The requirements for the Enrollment Server are the same as the requirements for Connection Server.

Aside from the latest version of the Connection Server, the requirements are:

ESXi – ESXi is required for hosting the virtual machine The versions of ESXi that are supported by Horizon 2006 can be found in the VMware compatibility matrix.

vCenter Server – The versions of vCenter that are supported by Horizon 2006 can be found in the VMware compatibility matrix.

Active Directory – An Active Directory environment is required to handle user authentication to virtual desktops, and the domain must be set to at least the Server 2012 R2 functional level.  Group Policy is used for configuring parts of the environment, including desktop settings, user data redirection, UEM, and the remoting protocol.

Advanced Features

Horizon has a lot of features, and many of those features require additional components to take advantage of them.  These components add options like secure remote access, profile management, and instant clone desktops.

Secure Remote Access – The options for delivering secure remote access with Horizon have been simplified in Horizon 2006.  Traditionally, remote access had been provided by the Horizon Security Server, but this feature has been removed.  The Unified Access Gateway replaces the Security Server for all remote access functionality.

Networking Requirements – Horizon requires a number of ports to be opened to allow communication between the user’s endpoint and the remote desktop as well as communication between the management components.  The best source for showing all of the ports required by the various components is the VMware Horizon Network Ports diagram.  The Network Ports diagram can be found on TechZone.

Instant Clone Desktops – Instant Clones are a rapid desktop provisioning model.  With instant clones, desktops are created when the user signs in and are provisioned and ready to use within seconds.  When the user signs out, the desktop is destroyed.  Instant clones allow for elastic capacity and rolling image upgrades.  They support both floating and dedicated desktops.

One new feature of Horizon 2006 is a change to the Instant Clone provisioning model.  In Horizon 7, Instant Clones relied on a tree of VMs, including a powered-on parent VM on each host in the cluster that all of the desktops are forked from.  An additional deplopyment model is being added in Horizon 2006 that enables the benefits of Instant Clones without having to have that parent VM consuming resources on each host.

Other Components:  The Horizon Suite includes a number of tools to provide administrators with a full-fledged ecosystem for managing their virtual end-user computing environments.  These tools are App Volumes, Dynamic Environment Manager, and an on-premises version of Workspace ONE Access.

Horizon subscription licensing, including Horizon Universal Licensing, include the Horizon Service and it’s associated cloud features including Cloud Monitoring Service, Image Management Service, and Universal Broker, and an entitlement to ControlUp for user experience monitoring. The Horizon subscription licensing SKUs are required for running Horizon on cloud-based SDDCs like VMware Cloud on AWS, Azure VMware Service, and Google Cloud VMware Engine. These licenses also allow customers to utilize Horizon Cloud on Azure and Horizon Cloud on IBM Cloud.

Horizon 8.0 Part 1: Introduction

The last time VMware released a new major version of Horizon was back in 2016.  In the four years since Horizon 7 was released, there have been significant additions to the core product, including HTML5-based management and support consoles, significant enhancements to the Blast protocol and the Instant Clone provisioning model, the introduction of an Extended Service Branch for long-term support, and new client redirection features to support access to local drives, Skype for Business, and multimedia redirection.

Today, VMware has released the next major release of VMware Horizon.  Horizon 8, also known as Horizon 2006, brings several changes to the platform.  Some of these changes are large changes that bring new functionality to the platform, and other changes are deprecating or removing obsolete features.

Some of the features that are being removed, and their replacements are:

Deprecated/Removed Feature Replacement
Linked Clones and Composer* Instant Clones (available in all desktop SKUs)
Persistent Disks* and Persona Management DEM Standard/Enterprise and AV User Writable Volumes
Windows 7, Windows 8.1 and Server 2008 Support Windows 10 and Server 2012R2 and Newer
JMP Server Multicloud Assignments (Part of Horizon Subscription)
Horizon Administrator (FLEX/Flash Based) Horizon Console (HTML5)
ThinPrint VMware Integrated Printing
Security Server Unified Access Gateway
vRealize Operations for Horizon Cloud Monitoring Service and ControlUp Entitlement (Part of Horizon Subscription)

*Note: Linked Clones, Composer, and Persistent Disks are deprecated.  All other features listed have been removed from Horizon 2006.

Some of these changes have been in the works for a while.  Instant Clones have been around since Horizon 7 was released in 2016, and they have seen significant improvements with every release.  As part of Horizon 2006, Instant Clones will no longer be restricted to Horizon Enterprise and Horizon Apps Advanced.  Unified Access Gateway has been the designated Security Server replacement for a while now.

One of the most visible changes that comes with Horizon 8 is a change in branding and versioning.  Horizon is now moving to a naming scheme that involves the month and the year in the version that is in line with how many other brand their products.  This will make it easier to keep track of when a version is released. The first release of Horizon 8 will be 2006.

Some of the other changes that are included with Horizon 2006 are:

  • Expanded REST API that includes new primitives for managing entitlements and inventory items such as desktop pools and RDSH farms.
  • A new Instant Clone provisioning model that frees up resources on hosts by removing the instant clone parent VM that is deployed on each host.
  • Built-in digital watermarking tool to help protect intellectual property in virtual desktops

This is not an inclusive list, so please be sure to check out the release blog.  There will be more content explaining these features on Techzone in the coming days.

Series Overview

If you noticed the title, this is part 1 of a new series on Horizon.  The first part of this series will focus doing a basic Horizon architecture and setup.  After that, I hope to move into more advanced topics as time allows.  These include those that were not covered in my last series (or were left unfinished), including App Volumes, DEM, and RDSH.