Configuring a Headless CentOS Virtual Machine for NVIDIA GRID vGPU #blogtober

When IT administrators think of GPUs, the first thing that comes to mind for many is gaming.  But GPUs also have business applications.  They’re mainly found in high end workstations to support graphics intensive applications like 3D CAD and medical imaging.

But GPUs will have other uses in the enterprise.  Many of the emerging technologies, such as artificial intelligence and deep learning, utilize GPUs to perform compute operations.  These will start finding their way into the data center, either as part of line-of-business applications or as part of IT operations tools.  This could also allow the business to utilize GRID environments after hours for other forms of data processing.

This guide will show you how to build headless virtual machines that can take advantage of NVIDIA GRID vGPU for GPU compute and CUDA.  In order to do this, you will need to have a Pascal Series NVIDIA Tesla card such as the P4, P40, or P100 and the GRID 5.0 drivers.  The GRID components will also need to be configured in your hypervisor, and you will need to have the GRID drivers for Linux.

I’ll be using CentOS 7.x for this guide.  My base CentOS configuration is a minimal install with no graphical shell and a few additional packages like Nano and Open VM Tools.  I use Bob Planker’s guide for preparing my VM as a template.

The steps for setting up a headless CentOS VM with GRID are:

  1. Deploy your CentOS VM.  This can be from an existing template or installed from scratch.  This VM should not have a graphical shell installed, or it should be in a run mode that does not execute the GUI.
  2. Attach a GRID profile to the virtual machine by adding a shared PCI device in vCenter.  The selected profile will need to be one of the Virtual Workstation profiles, and these all end with a Q.
  3. GRID requires a 100% memory reservation.  When you add an NVIDIA GRID shared PCI device, there will be an associated prompt to reserve all system memory.
  4. Update the VM to ensure all applications and components are the latest version using the following command:
    yum update -y
  5. In order to build the GRID driver for Linux, you will need to install a few additional packages.  Install these packages with the following command:
    yum install -y epel-release dkms libstdc++.i686 gcc kernel-devel 
  6. Copy the Linux GRID drivers to your VM using a tool like WinSCP.  I generally place the files in /tmp.
  7. Make the driver package executable with the following command:
    chmod +X NVIDIA-Linux-x86_64-384.73-grid.run
  8. Execute the driver package.  When we execute this, we will also be adding the –dkms flag to support Dynamic Kernel Module Support.  This will enable the system to automatically recompile the driver whenever a kernel update is installed.  The commands to run the the driver install are:
    bash ./NVIDIA-Linux-x86_64-384.73-grid.run –dkms
  9. When prompted, select yes to register the kernel module sources with DKMS by selecting Yes and pressing Enter.Headless 1
  10. You may receive an error about the installer not being able to locate the X Server path.  Click OK.  It is safe to ignore this error.Headless 2
  11. Install the 32-bit Compatibility Libraries by selecting Yes and pressing Enter.Headless 3
  12. At this point, the installer will start to build the DKMS module and install the driver.  Headless 4
  13. After the install completes, you will be prompted to use the nvidia-xconfig utility to update your X Server configuration.  X Server should not be installed because this is a headless machine, so select No and press Enter.Headless 5
  14. The install is complete.  Press Enter to exit the installer.Headless 6
  15. To validate that the NVIDIA drivers are installed and running properly, run nvidia-smi to get the status of the video card.  headless 7
  16. Next, we’ll need to configure GRID licensing.  We’ll need to create the GRID licensing file from a template supplied by NVIDIA with the following command:
    cp  /etc/nvidia/gridd.conf.template  /etc/nvidia/gridd.conf
  17. Edit the GRID licensing file using the text editor of your choice.  I prefer Nano, so the command I would use is:
    nano  /etc/nvidia/gridd.conf
  18. Fill in the ServerAddress and BackupServerAddress fields with the fully-qualified domain name or IP addresses of your licensing servers.
  19. Set the FeatureType to 2 to configure the system to retrieve a Virtual Workstation license.  The Virtual Workstation license is required to support the CUDA features for GPU Compute.
  20. Save the license file.
  21. Restart the GRID Service with the following command:
    service nvidia-gridd restart
  22. Validate that the machine retrieved a license with the following command:
    grep gridd /var/log/messages
  23. Download the NVIDIA CUDA Toolkit.
    wget https://developer.nvidia.com/compute/cuda/9.0/Prod/local_installers/cuda_9.0.176_384.81_linux-run
  24. Make the toolkit installer executable.
    chmod +x cuda_9.0.176_384.81_linux-run.sh
  25. Execute the CUDA Toolkit installer.
    bash cuda_9.0.176_384.81_linux-run.sh
  26. Accept the EULA.
  27. You will be prompted to download the CUDA Driver.  Press N to decline the new driver. This driver does not match the NVIDIA GRID driver version, and it will break the NVIDIA setup.  The GRID driver in the VM has to match the GRID software that is installed in the hypervisor.
  28. When prompted to install the CUDA 9.0 toolkit, press Y.
  29. Accept the Default Location for the CUDA toolkit.
  30. When prompted to create a symlink at /usr/local/cuda, press Y.
  31. When prompted to install the CUDA 9.0 samples, press Y.
  32. Accept the default location for the samples.Headless 8
  33. Reboot the virtual machine.
  34. Log in and run nvidia-smi again.  Validate that you get the table output similar to step 15.  If you do not receive this, and you get an error, it means that you likely installed the driver that is included with the CUDA toolkit.  If that happens, you will need to start over.

At this point, you have a headless VM with the NVIDIA Drivers and CUDA Toolkit installed.  So what can you do with this?  Just about anything that requires CUDA.  You can experiment with deep learning frameworks like Tensorflow, build virtual render nodes for tools like Blender, or even use Matlab for GPU compute.

Nutanix Xtract for VMs #blogtober

One of the defining features of the Nutanix platform is simplicity.  Innovations like the Prism interface for infrastructure management and One-Click Upgrades for both the Nutanix software-defined storage platform and supported hypervisors have lowered the management burden of on-premises infrastructure.

Nutanix is now looking to bring that same level of simplicity to migrating virtual machines to a new hypervisor.  Nutanix has released a new tool today called Xtract for VM.  This tool, which is free to all Nutanix customers, brings the same one-click simplicity that Nutanix is known for to migrating workloads from ESXi to AHV.

So how does Xtract for VM differentiate from other migration tools?  First, it is an agentless migration tool.  Xtract will communicate with vCenter to get a list of VMs that are in the ESXi infrastructure, and it will build a migration plan and synchronize the VM data from ESXi to AHV.

During data synchronization and migration, Xtract will insert the AHV device drivers into the virtual machine.  It will also capture and preserve the network configuration, so the VM will not lose connectivity or require administrator intervention after the migration is complete.

Xtract1

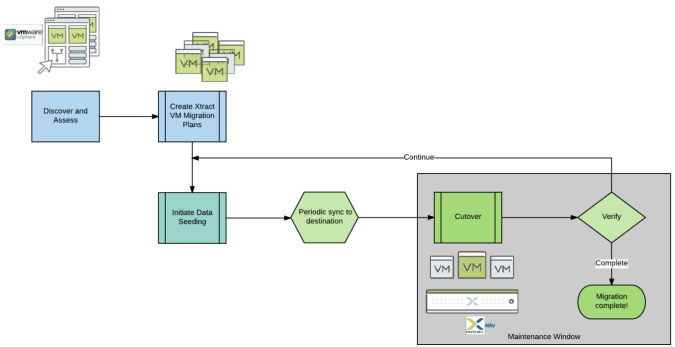
By injecting the AHV drivers and preserving the network configuration during the data synchronization and cutover, Xtract is able to perform cross-hypervisor migrations with minimal downtime.  And since the original VM is not touched during the migration, rollback is as easy as shutting down the AHV VM and powering the ESXi VM back on, which significantly reduces the risk of cross-hypervisor migrations.

Analysis

The datacenter is clearly changing, and we now live in a multi-hypervisor world.  While many customers will still run VMware for their on-premises environments, there are many that are looking to reduce their spend on hypervisor products.  Xtract for VMs provides a tool to help reduce that cost while providing the simplicity that Nutanix is known for.

While Xtract is currently version 1.0, I can see this technology be a pivotal for helping customers move workloads between on-premises and cloud infrastructures.

To learn more about this new tool, you can check out the Xtract for VMs page on Nutanix’s webpage.

Coming Soon – The Virtual Horizon Podcast #blogtober

I’ve been blogging now for about seven or so years, and The Virtual Horizon has existed in it’s current form for about two or three years.

So what’s next?  Besides for more blogging, that is…

It’s time to go multimedia.  In the next few weeks, I will be launching The Virtual Horizon Podcast.  The podcast will only partially focus on the latest in end-user computing, and I hope to cover other topics such as career development, community involvement, and even other technologies that exist outside of the EUC space.

I’m still working out some of the logistics and workflow, but the first episode has already been recorded.  It should post in the next couple of weeks.

So keep an eye out here.  I’ll be adding a new section to the page once we’re a bit closer to go-live.