Since I joined VMware back in November, I’ve spent a lot of time working with VMware Cloud on AWS – particularly around deploying Horizon 7 on VMC in my team’s lab. One thing I hadn’t tried until recently was utilizing Amazon RDS with Horizon.
No, we’re not talking about the traditional Remote Desktop Session Host role. This is the Amazon Relational Database Service, and it will be used as the Event Database for Horizon 7.
After building out a multisite Horizon 7.8 deployment in our team lab, we needed a database server for the Horizon Events Database. Rather than deploy and maintain a SQL Server in each lab, I decided to take advantage of one of the benefits of VMware Cloud on AWS and use Amazon RDS as my database tier.
This isn’t the first time I’ve used native Amazon services with Horizon 7. I’ve previously written about using Amazon Route 53 with Horizon 7 on VMC.
Before we begin, I want to call out that this might not be 100% supported. I can’t find anything in the documentation, KB58539, or the readme files that explicitly state that RDS is a supported database platform. RDS is also not listed in the Product Interoperability Matrix. However, SQL Server 2017 Express is supported, and there are minimal operational impacts if this database experiences an outage.
What Does a VDI Solution Need With A Database Server?
VMware Horizon 7 utilizes a SQL Server database for tracking user session data such as logins and logouts and auditing administrator activities that are performed in the Horizon Administrator console. Unlike on-premises environments where there are usually existing database servers that can host this database, deploying Horizon 7 on VMware Cloud on AWS would require a new database server for this service.
Amazon RDS is a database-as-a-service offering built on the AWS platform. It provides highly scalable and performant database services for multiple database engines including Postgres, Microsoft SQL Server and Oracle.
Using Amazon RDS for the Horizon 7 Events Database
There are a couple of steps required to prepare our VMware Cloud on AWS infrastructure to utilize native AWS services. While the initial deployment includes connectivity to a VPC that we define, there is still some networking that needs to be put into place to allow these services to communicate. We’ll break this work down into three parts:
- Preparing the VMC environment
- Preparing the AWS VPC environment
- Deploying and Configuring RDS and Horizon
Preparing the VMC Environment
The first step is to prepare the VMware Cloud on AWS environment to utilize native AWS services. This work takes place in the VMware Cloud on AWS management console and consists of two main tasks. The first is to document the availability zone that our VMC environment is deployed in. Native Amazon services should be deployed in the same availability zone to reduce any networking costs. Firewall rules need to be configured on the VMC Compute Gateway to allow traffic to pass to the VPC.
The steps for preparing the VMC environment are:
- Log into https://cloud.vmware.com
- Click Console
- In the My Services section, select VMware Cloud on AWS
- In the Software-Defined Data Centers section, find the VMware Cloud on AWS environment that you are going to manage and click View Details.
- Click the Networking and Security tab.
- In the System menu, click Connected VPC. This will display information about the Amazon account that is connected to the environment.
- Find the VPC subnet. This will tell you what AWS Availability Zone the VMC environment is deployed in. Record this information as we will need it later.
Now that we know which Availability Zone we will be deploying our database into, we will need to create our firewall rules. The firewall rules will allow our Connection Servers and other VMs to connect to any native Amazon services that we deploy into our connected VPC.
This next section picks up from the previous steps, so you should be in the Networking and Security tab of the VMC console. The steps for configuring our firewall rules are:
- In the Security Section, click on Gateway Firewall.
- Click Compute Gateway
- Click Add New Rule
-
Create the new firewall rule by filling in the following fields:
- In the Name field, provide a descriptive name for the firewall rule.
- In the Source field, click Select Source. Select the networks or groups and click Save.
Note: If you do not have any groups, or you don’t see the network you want to add to the firewall, you can click Create New Group to create a new Inventory Group. - In the Destination field, click Select Destination. Select the Connected VPC Prefixes option and click Save.
- In the Services field, click Select Services. Select Any option and click Save.
- In the Applied To field, remove the All Interfaces option and select VPC Interfaces.
- Click Publish to save and apply the firewall rule.
There are two reasons that the VMC firewall rule is configured this way. First, Amazon assigns IP addresses at service creation. Second, this firewall rule can be reused for other AWS Services, and access to those services can be controlled using AWS Security Groups instead.
The VMC gateway firewall does allow for more granular rule sets. They are just not going to utilized in this walkthrough.
Preparing the AWS Environment
Now that the VMC environment is configured, the RDS service needs to be provisioned. There are a couple of steps to this process.
First, we need to configure a security group that will be used for the service.
- Log into your Amazon Console.
- Change to the region where your VMC environment is deployed.
- Go into the VPC management interface. This is done by going to Services and selecting VPC.
- Select Security Groups
- Click Create Security Group
- Give the security group a name and description.
- Select the VPC where the RDS Services will be deployed.
- Click Create.
- Click Close.
- Select the new Security Group.
- Click the Inbound Rules tab.
- Click Edit Rules
- Click Add Rule
-
Fill in the following details:
- Type – Select MS SQL
- Source – Select Custom and enter the IP Address or Range of the Connection Servers in the next field
- Description – Description of the server or network
- Repeat as Necessary
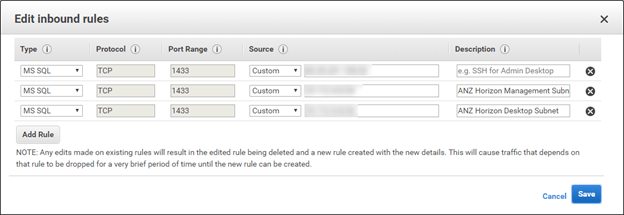
- Click Save Rules
This security group will allow our connection servers to access the database services that are being hosted in RDS.
Once the security group is created, the RDS instance can be deployed. The steps for deploying the RDS instance are:
- Log into your Amazon Console.
- Change to the region where your VMC environment is deployed.
- Go into the RDS management interface. This is done by going to Services and selecting RDS.
- Click Create Database.
- Select Microsoft SQL Server.

-
Select the version of SQL Server that will be deployed. For this walkthrough, SQL Server Express will be used.
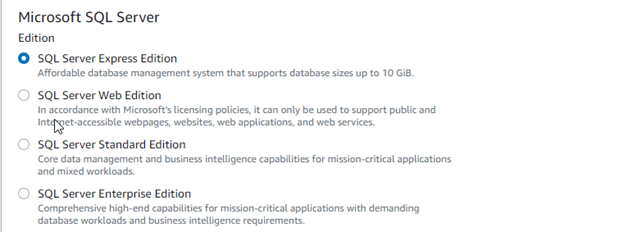
Note: There is a SQL Server Free Tier offering that can be used if this database will only be used for the Events Database. The Free Tier offering is only available with SQL Server Express. If you only want to use the Free Tier offering, select the Only enable options eligible for RDS Free Tier Usage.

- Click Next.
-
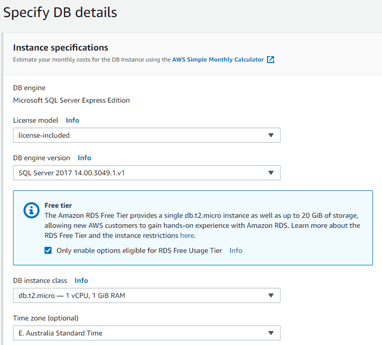
Specify the details for the RDS Instance.
- Select License Model, DB Engine Version, DB instance class, Time Zone, and Storage.
Note: Not all options are available if RDS Free Tier is being utilized.
- Provide a DB Instance Identifier. This must be unique for all RDS instances you own in the region.
- Provide a master username. This will be used for logging into the SQL Server instance with SA rights.

- Provide and confirm the master username password.
- Click Next.
- Select License Model, DB Engine Version, DB instance class, Time Zone, and Storage.
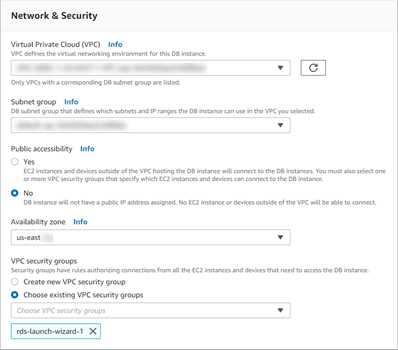
- Configure the Networking and Security Options for the RDS Instance.
-
- Select the VPC that is attached to your VMC instance.
- Select No under Public Accessibility.
Note: This refers to access to the RDS instance via a public IP address. You can still access the RDS instance from VMC since routing rules and firewall rules will allow the communication. - Select the Availability Zone that the VMC tenant is deployed in.
- Select Choose Existing VPC Security Groups
- Remove the default security group by clicking the X.
- Select the security group that was created for accessing the RDS instance.
-
- Select Disable Performance Insights.
- Select Disable Auto Minor Version Upgrade.
- Click Create Database.
Once Create Database is clicked, the deployment process starts. This takes a few minutes to provision. After provisioning completes, the Endpoint URL for accessing the instance will be available in the in RDS Management Console. It’s also important to validate that the instance was deployed in the correct availability zone. While testing this process, some database instances were created in an availability zone that was different from the one selected during the provisioning process.
Make sure you copy your Endpoint URL. You will need this in the next step to configure the database and Horizon.

Creating the Horizon Events Database
The RDS instance that was provisioned in the last step is an empty SQL Server instance. There are no databases or SQL Server user accounts, and these will need to be created in order to use this server with Horizon. A tool like SQL Server Management Studio is required to complete these steps, and we will be using SSMS for this walkthrough. The instance must be accessible from the machine that has the database management tools installed.
The Horizon Events Database does not utilize Windows Authentication, so a SQL Server user will be required along with the database that we will be setting up. This also requires DB_Owner rights on that database so it can provision the tables when we configure it in Horizon the first time.
The steps for configuring the database server are:
- Log into new RDS instance using SQL Server Management Studio using the Master Username and Password.
- Right Click on Databases
- Select New Database
- Enter HorizonEventsDB in the Database Name Field.
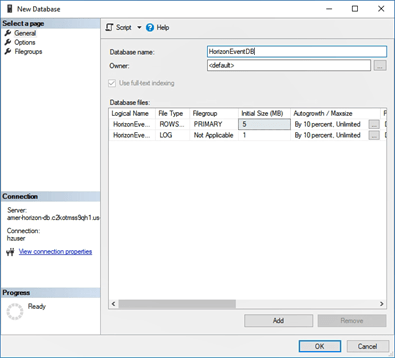
- Click OK.
- Expand Security.
- Right click on Logins and select New Login.
- Enter a username for the database.
- Select SQL Server Authentication
- Enter a password.
- Uncheck Enforce Password Policy
- Change the Default Database to HorizonEventsDB
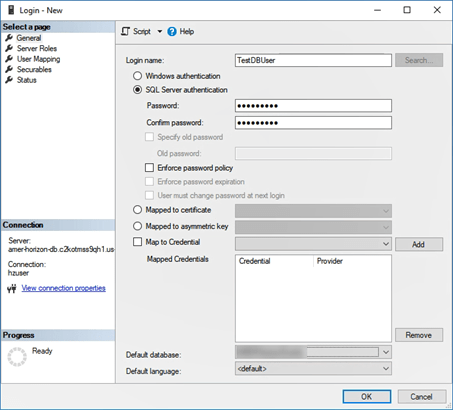
- In the Select A Page section, select User Mapping
- Check the box next to HorizonEventsDB
- In the Database Role Membership section, select db_owner
- Click OK
Configuring Horizon to Utilize RDS for the Events Database
Now that the RDS instance has been set up and configured, Horizon can be configured to use it for the Events Database. The steps for configuring this are:
- Log into Horizon Administrator.
- Expand View Configuration
- Click on Event Configuration
- Click Edit
- Enter the Database Server, Database Name, Username, and Password and click OK.

Benefits of Using RDS with Horizon 7
Combining VMware Horizon 7 with Amazon RDS is just one example of how you can utilize native Amazon services with VMware Cloud on AWS. This allows organizations to get the best of both worlds – easily consumed cloud services to back enterprise applications with an platform that requires few changes to the applications themselves and operational processes.
Utilizing native AWS services like RDS has additional benefits for EUC environments. When deploying Horizon 7 on VMware Cloud on AWS, the management infrastructure is typically deployed in the Software Defined Datacenter alongside the desktops. By utilizing native AWS services, resources that would otherwise be reserved for and consumed by servers can now be utilized for desktops.
