My VCDX Journey – One Year In

Last year, I set a rather challenging goal for myself – to become a VCDX within three years.  I’m now one year in, and I wanted to update my progress.

When I first set the goal, I had only just achieved VCP status with the VCP5-DCV and the VCP5-DT and I was looking at the daunting challenge of the VCAP exams.

Today, I’m much closer to achieving a VCDX.  I’ve completed the prerequisite exams for the VCDX-DT.

But I’m not ready to take the next step of the journey yet.  Although I gained a lot of valuable experience from Virtual Design Master, I don’t have enough real-world experience to put together a #VCDX quality design.

I’m not sure how I am going to rectify this yet, but I have the next year to figure it out and start working on a formal design.

Community Matters – A VMworld 2014 Retrospective

This year’s VMworld was the second that I had the pleasure of attending.  Last year had been my first, and while I had a good time, I didn’t really know anyone or even know what I wanted to get out of it, and I wasn’t the type to just walk up to someone I talked to on Twitter and introduce myself or engage in table talk.

And most nights, after the sessions were done, I would grab dinner alone and go back to my hotel.

What a difference a year makes.

Last year’s conference opened the door and showed how wide and vibrant the greater virtualization community is.  It encouraged me to get more active in my local VMUG, on twitter and through community events such as Virtual Design Master.

I put myself out there, and I grew as both an IT Professional and a person, and along the way, I made new connections and new friends, and my experience at VMworld this year was different because of it.

The moral of the story is to get involved with your local user communities.  Build relationships with others in your profession through groups like VMUG or AITP.  And if one doesn’t exist (or worse, inactive) build it up so others can get the same benefits.

The Changing Face of EUC

The first section of Tuesday’s keynote was devoted to VMware’s End-User Computing division, and they shared their vision for the future of the market.

And let me tell you – it’s game changing.

{Note: I do not have early access to any of the EUC technologies discussed below.  Everything discussed below is from the keynote.]

VMware demonstrated the expanded capabilities in Horizon 6 and the improvements that they’ve made to the Blast protocol.  It’s now possible to deliver 3D applications, such as Autodesk 3D Max and the Adobe Creative Suite, to users without having to install a client on your machine.  Yes, it’s all accessible from an HTML5-enabled web browser.

They demoed CloudVolumes. CloudVolumes is an application layering technology that can overlay desktop applications onto a desktop in real time with no need to recompose linked clone desktops or use complex deployment tools like SCCM.  And it’s easy enough that you can delegate this task to the Help Desk.

And they also talked about the Horizon Suite.  In previous versions of Horizon, the products were stand-alone with limited integration.  VMware has started changing this and more closely integrating the Horizon Suite products in the same way that they’ve been been integrating products into the vCloud Suite.

My employer works in the construction industry, and we have projects across the country.  These jobs often require heavy 3D graphics to support the Autodesk REVIT MEP suite for building information management, and that means deploying workstations that can run MEP effectively to these locations.

The features of the Horizon Suite would change this.  Engineers and Project Managers would be able to access a desktop with AutoCAD from  Safari on an iPad or Chromebook from any jobsite anywhere in the country and provide feedback to engineers in the office.  Engineers would be able to go onsite and work with CAD without having to lug around a 30 pound workstation laptop.

But that wasn’t the most disruptive announcement.  One of the new features that was announced was Project Fargo.  Project Fargo will utilize features in vSphere 6 (currently in beta) to rapidly deploy “disposable” virtual machines up to 30x faster than deploying linked clones.  It almost sounds like the next version of vSphere will be able to use a process similar to forking a process in Linux to build up and tear down desktops.

When you combine Project Fargo with Persona Management (or Liquidware Labs ProfileUnity) and CloudVolumes, you get fully-configured Just-In-Time desktops.

I hope that we’ll hear more about these features over the next couple of months.

#vBrownbag TechTalk at VMworld

The great folks who run #vBrownbag are hosting another series of Tech Talks at this year’s VMworld.  These short talks are given in the Hang Space and feature community members presenting on topics that they’re passionate about and cover a variety of topics including Log Insight, Docker, and OpenStack. 

I’ll be giving a Tech Talk on automating the Microsoft stack using vCenter Orchestrator and PowerShell on Monday at 4:30.

The entire schedule is available here.

If you haven’t double (or tripled) booked yourself yet, and you’re passionate about a topic, there are still some slots available. 

Horizon View 6.0 Part 7–Installing View Composer

The last couple of posts have dealt with preparing the environment to install Horizon View 6.0.  We’ve covered prerequisites, design considerations, preparing Active Directory, and even setting up the service accounts that will be used for accessing services and databases.

Now its time to actually install and configure the Horizon View components.  These tasks will be completed in the following order:

  • Install Horizon View Composer
  • Install Horizon View Connection Server
  • Configure the Environment for the first time
  • Install the Security Server

One note that I want to point out is that the installation process for most components has not changed significantly from previous versions.

Before we can install Composer, we need to create an ODBC Data Source to connect to the Composer database.  The database and the account for accessing the database were created in Part 6.  Composer can be installed once the ODBC data source has been created.

Composer can either be installed on your vCenter Server or on a separate Windows Server.  The first option is only available if you are using the Windows version of vCenter.  This walkthrough assumes that Composer is being installed on a separate server.


Service Account

Part 6 covers the steps for creating the Composer service account.  This account should have local administrator rights on the server prior to installing Composer.

Creating the ODBC Data Source

Unfortunately, the Composer installer does not create the ODBC Data Source driver as part of the Composer installation, and this is something that will need to be created by hand before Composer can be successfully installed.  The View Composer database doesn’t require any special settings in the ODBC setup, so this step is pretty easy.

Note: The ODBC DSN setup can be launched from within the installer, but I prefer to create the data source before starting the installer.  The steps for creating the data source are the same whether you launch the ODBC setup from the start menu or in the installer.

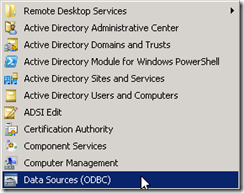
1. Go to Start –> Administrative Tools –> Data Sources (ODBC)

2014-01-04_22-25-06

2. Click on the System DSN tab.

3. Click Add.

2014-01-04_22-25-44

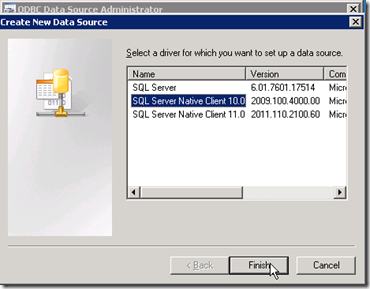
4. Select SQL Server Native Client 10.0 and click Finish.  This will launch the wizard that will guide you through setting up the data source.

2014-01-04_22-26-27

Note:  SQL Server 2012 uses Native Client 11.0. If the Composer database is installed on SQL Server 2012, Native Client 11.0 should be used.

Note: The SQL Server Native Client is not installed by default. If you are connecting to a database on another server, you will need to download and install the native client for SQL Server 2008 R2 from Microsoft (direct download link). 

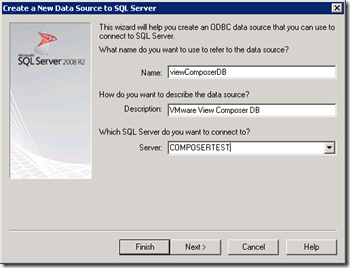
5. When the Create a New Data Source wizard launches, you will need to enter a name for the data source, a description, and the name of the SQL Server that the database resides on.  If you have multiple instances on your SQL Server, it should be entered as ServerName\InstanceName.  Click next to continue.

2014-01-06_22-50-48

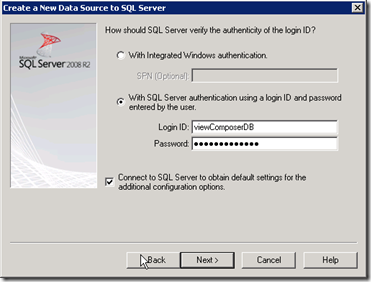
6. Select SQL Server Authentication.  Enter your SQL Server username and password that you created above.  Optional: Check the Connect to SQL Server to obtain default settings box to retrieve the default settings from the server.  Click Next to continue.

2014-01-04_22-28-15

7. Change the default database to the viewComposer database that you created above.  Click Next to continue.

2014-01-04_22-28-55

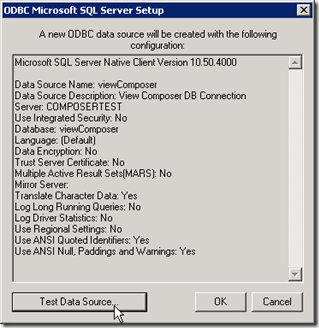
8. Click Test Data Source to verify that your settings are correct.

2014-01-04_22-29-19

9. If your database settings are correct, you will see the windows below.  If you do not see the TESTS COMPLETED SUCCESSFULLY, verify that you have entered the correct username and password and that your login has the appropriate permissions on the database object.  Click OK to return to the previous window.

2014-01-04_22-29-37

10. Click OK to close the Data Source Administrator and return to the desktop.

2014-01-04_22-29-55

Installing View Composer

Once the database connection has been set up, Composer can be installed.  The steps for installing Composer are:

1.  Launch the View Composer installer.

2.  If .Net Framework 3.5 SP1 is not installed, you will be prompted to install the feature before continuing.

1

3.  Click Next to continue.

2

4.  Accept the license agreement and click next.

3

5.  Select the destination folder where Composer will be installed.

4

6. Configure View to use the ODBC data source that you set up.  You will need to enter the data source name, SQL login, and password before continuing.

7

7. After the data source has been configured, you will need to select the port that Composer will use for communicating with the View Connection Servers.  You also have the option of selecting an existing certificate if you have installed one.

8

8. Click Install to start the installation.

9

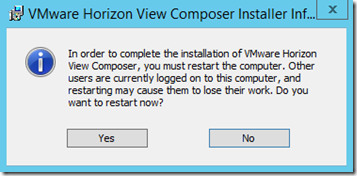
9. Once the installation is finished, you will be prompted to restart your computer.

10

So now that Composer is installed, what can we do with it?  Not much at the moment.  A connection server is required to configure and use Composer for linked clone desktops, and the next post in this series will cover how to install that Connection Server.

Horizon View 6.0 Part 6–Configuring the Horizon View Service Accounts and Databases

Back in Part 4, I mentioned that Horizon View required up to a few service accounts to function properly.  One of these accounts is for accessing vCenter to provision and manage the virtual machines that users will connect to.  The other service account is for View Composer and will manage the accounts within Active Directory.  This account is not required if you are not planning to use View Composer and Linked Clones within your environment.

In addition to these two service accounts, two database accounts may need to be created for the Horizon View Composer database and the Horizon View Events Database.

It’s important to build these accounts with the principle of least privileged access in mind.  These accounts should not have more rights than they would need.  So while the easy way out would be to give these accounts vCenter Administrator, Domain Administrator, and SQL Server or Oracle SysAdmin rights, it would not be a good idea as these accounts could potentially be compromised.

vCenter Service Account

The first account that needs to be created is a service account that View will use for accessing vCenter.  Horizon View uses this account for provisioning and power operations.  The service account should be a standard Active Directory domain user account without any additional administrator-level rights on the domain or on the vCenter server.

There are a couple of different ways to configure your Horizon View environment, sp the actual rights required by vCenter will vary.  I will be using View Composer in this series, so I will be setting up the vCenter Service Account with the permissions required to use View Composer.

Note: If you are not using View Composer, or you plan to use View Composer and Local Mode, different permissions will be required in vCenter.  Please see Chapter x of the Horizon View 6.0  Installation Guide for more details on the permissions that need to be assigned to the service account.

A new role will need to be created within vCenter in order to assign the appropriate permissions.  To create a new role in the vCenter Web Client, you need to go to Administration –> Roles from the main page.  This will bring up the roles page, and we can create a new role from here by clicking on the green plus sign.

2013-12-29_19-14-37

The permissions that need to be assigned to our new role are:

Privilege Group

Privilege

Datastore Allocate Space
Browse Datastore
Low Level File Operations
Folder Create Folder
Delete Folder
Virtual Machine Configuration –> All Items
Inventory –> All Items
Snapshot Management –> All Items
Interaction:
Power On
Power Off
Reset
Suspend
Provisioning:
Customizing
Deploy Template
Read Customization Spec
Clone Virtual Machine
Allow Disk Access
Resource Assign Virtual Machine to Resource Pool
Migrate Powered-Off Virtual Machine
Global Enable Methods
Disable Methods
System Tag
Act As vCenter
Note 1
Network All
Host Configuration:
Advanced Settings Note 1

Note 1: Act as vCenter and Host Advanced Settings are only needed if View Storage Accelerator are used.  If these features are not used, these permissions are not required.

After the role has been created, we will need to assign permissions for our vCenter Server service account to the vCenter root.  To do this from the roles screen, you will need to go back to the vCenter Web Client Home screen and take the following steps:

  1. Select vCenter
  2. Select vCenter Servers under Inventory Lists
  3. Select the vCenter that you wish to grant permissions on
  4. Click on the Manage Tab
  5. Click Permissions
  6. Click the Green Plus Sign to add a new permission
  7. Select the role for View Composer
  8. Add the Domain User who should be assigned the role
  9. Click OK.

2013-12-29_20-33-59

View Events Database Account

The Events Database is a repository for events that happen with the View environment.  Some examples of events that are recorded include logon and logoff activity and Composer errors.

The Events Database requires a Microsoft SQL Server or Oracle database server, and it should be installed on an existing production database server.  There are two parts to configuring the events database.  The first part, creating the database and the database user, needs to be done in SQL Server Management Studio before the event database can be configured in View Administrator.  The steps for configuring Horizon View to use the Events database will happen in another post.

To set up the database, follow these steps:

1. Open SQL Server Management Studio and log in with an account that has permissions to create users and databases.

2. Expand Security –> Logins.

3. Right-click on Logins and Select New Login…

1. Create New User 1

4. Enter the SQL Login Name and Password and then click OK.

2. Create New User 2

5. Expand Databases.

6. Right-click on Databases and select New Database.

7. Enter the database name.  Select the database user that you created above as the database owner.  Click OK to create the database.

3. Create View Events Database

Note: SQL Server named instances are configured to use dynamic ports.  This means that SQL Server will use a new port every time the server is restarted.  The events database does not support dynamic ports, so a static port will need to be configured and the SQL instance restarted prior to configuring the events database in View.  For instructions on how to configure a static ports in SQL Server, please see this article.

View Composer Service Accounts

The last two accounts that need to be set up are for Horizon View Composer.  These accounts are only required if you plan on using Composer and linked clone desktops.

Depending on your configuration, Composer may require two service accounts.  These accounts are:

1. An Active Directory User Account – This service account is used by View for accessing Composer.  This account requires local administrator rights on the Composer server and rights to create computer objects in Active Directory.

2. A Horizon View Composer Database User – This service account is a local SQL Server user account and is required if the SQL Server database is located on a remote server.  If SQL Server is installed on the Composer Server, Windows authentication can be used.

Configuring the Composer Service Account

The first is the account that will be used by View Composer.  This account can be created as a standard domain user.  This account should not have domain administrator or account operator rights – it only needs a select group of permissions on the OU (or OUs) where the View Desktops are being stored.

After this account has been created, you need to delegate permissions to it on the OU (or OUs) where your VDI desktops will be placed.  If you use the structure like the one I outlined above, you only need to delegate permissions on the top-level OU and permission inheritance, if turned on, will apply them to any child or grandchild objects beneath it.

Note:  If inheritance is not turned on, you will need to check the Apply to All Child Objects checkbox before applying the permissions.

The permissions that need to be delegated on the OU are:

  • Create Computer Objects
  • Delete Computer Objects
  • Write All Properties
  • Reset Password

Note: Although granting this account Domain Administrator or Account Operator permissions may seem like an easy way to grant it the permissions it needs, it will grant a number of other permissions that are not needed and could pose a security risk if that account is compromised.  Only the required permissions should be granted in a production environment.

The account will also need to be granted local administrator rights on the Composer server.  If the account is not a local administrator, you will not be able to configure Composer from within the View Administrator.

Configuring the Composer Database and Database Service Account

Like the Event database above, Composer requires its own database.  This database is used to keep track of linked clones, replicas, and pending recompose operations.

The steps below will walk through setting up the Composer database.  If your Composer database is located on a separate server, you will have to use SQL authentication, and the steps for creating the SQL user are included.

Note: If your Composer database is located on the same server as the Composer service, you can use Windows Authentication for accessing the database.

1. Log into your database server and open SQL Server Management Studio.
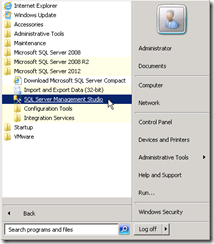
2014-01-04_22-20-17

2. Log in as a user with administrator rights on SQL Server.

3. Create a new SQL Login by expanding Security –> Logins.  Right click on Logins and select New Login.
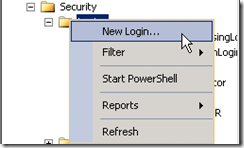
2014-01-04_22-21-46

4. Enter a login name such as viewComposerDB or viewComposerUser, select SQL Server Authentication, and enter a password twice.  You may also need to disable Enforce Password Expiration or Enforce Password Policy depending on your environment.  Click OK to create the account.  Note: Check with your DBA on password policy settings.

2014-01-04_22-23-50

5. After the SQL login is created, you need to create an empty database.  To create the database, right click on the database folder and select New Database.
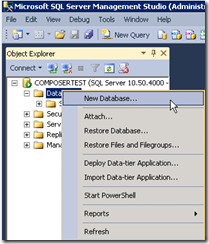
2014-01-04_22-19-58

6. In the database name field, enter a name such as viewComposer.  This will be the name of the database.  To select an owner for the database, click on the … button and search for the database user account you created above.  Click OK to create the database.

2014-01-04_22-24-23

You will have a blank database that you can use for View Composer after you click OK.

Configuring Composer to use this database will be covered during the Composer installation.

This wraps up all of the prerequisites for the environment.  In the next couple of sections, I will be covering the installation and configuration of Horizon View.
Horizon View 6.0 Part 5–SSL Certificates

SSL certificates are an important part of all Horizon View environments .  They’re used to secure communications from client to server as well as between the various servers in the environment.  Improperly configured or maintained certificate authorities can bring an environment to it’s knees – if a connection server cannot verify the authenticity of a certificate – such as an expired revocation list from an offline root CA, it will stop any communications with the impacted host.

If you read my previous series on View 5.3, the post about SSL certificates was the last regular post in the series, and it came after the other components were installed and configured.  In an production environment, you would most likely install the SSL certificates before installing the Horizon View components.

Most of the certificates that you will need for your environment will need to be minted off of an internal certificate authority.  If you are using a security server to provide external access, you will need to acquire a certificate from a public certificate authority.  If you’re building a test lab or don’t have the budget for a valid certificate, you can use a free certificate authority such as StartSSL.

Prerequisites

Before you can begin creating certificates for your environment, you will need to have a certificate authority infrastructure set up.  Microsoft has a great 2-Tier PKI walkthrough on TechNet. 

Note: If you use the walkthrough to set up your PKI environment., you will need to alter the configuration file to remove the  AlternateSignatureAlgorithm=1 line.  This feature does not appear to be supported on vCenter  and can cause errors when importing certificates.

Once your environment is set up, you will want to create a template for all certificates used by VMware products.  Derek Seaman has a good walkthrough on creating a custom VMware certificate template.

Note: Although a custom template isn’t required, I like to create one per Derek’s instructions so all VMware products are using the same template.

Creating The Certificate Request

Horizon View 6.0 handles certificates the same way as Horizon View 5.3.  Certificates are stored in the Windows certificate store, so the best way of generating certificate requests is to use the certreq.exe certificate tool.  This tool can also be used to submit the request to a local certificate authority and accept and install a certificate after it has been issued.

Certreq.exe can use a custom INF file to create the certificate request.  This INF file contains all of the parameters that the certificate request requires, including the subject, the certificate’s friendly name, if the private key can be exported, and any subject alternate names that the certificate requires.

If you plan to use Subject Alternate Names on your certificates, I highly recommend reviewing this article from Microsoft.  It goes over how to create a certificate request file for SAN certificates.

A  certificate request inf file that you can use as a template is below.  To use this template, copy and save the text below into a text file, change the file to match your environment, and save it as a .inf file.

;----------------- request.inf -----------------
[Version]

Signature="$Windows NT$"

[NewRequest]

Subject = "CN=<Server Name>, OU=<Department>, O=<Company>, L=<City>, S=<State>, C=<Country>" ; replace attribues in this line using example below
KeySpec = 1
KeyLength = 2048
; Can be 2048, 4096, 8192, or 16384.
; Larger key sizes are more secure, but have
; a greater impact on performance.
Exportable = TRUE
FriendlyName = "vdm"
MachineKeySet = TRUE
SMIME = False
PrivateKeyArchive = FALSE
UserProtected = FALSE
UseExistingKeySet = FALSE
ProviderName = "Microsoft RSA SChannel Cryptographic Provider"
ProviderType = 12
RequestType = PKCS10
KeyUsage = 0xa0

[EnhancedKeyUsageExtension]

OID=1.3.6.1.5.5.7.3.1 ; this is for Server Authentication

[Extensions]

2.5.29.17 = "{text}"
_continue_ = "dns=<DNS Short Name>&"
_continue_ = "dns=<Server FQDN>&"
_continue_ = "dns=<Alternate DNS Name>&"

[RequestAttributes]

CertificateTemplate = VMware-SSL

;-----------------------------------------------

Note: When creating a certificate, the state or province should not be abbreviated.  For instance, if you are in Wisconsin, the full state names should be used in place of the 2 letter state postal abbreviation.

Note:  Country names should be abbreviated using the ISO 3166 2-character country codes.

The command the generate the certificate request is:

certreq.exe –New <request.inf> <certificaterequest.req>

Submitting the Certificate Request

Once you have a certificate request, it needs to be submitted to the certificate authority.  The process for doing this can vary greatly depending on the environment and/or the third-party certificate provider that you use. 

If your environment allows it, you can use the certreq.exe tool to submit the request and retrieve the newly minted certificate.  The command for doing this is:

certreq –submit -config “<ServerName\CAName>” “<CertificateRequest.req>” “<CertificateResponse.cer>

If you use this method to submit a certificate, you will need to know the server name and the CA’s canonical name in order to submit the certificate request.

Accepting the Certificate

Once the certificate has been generated, it needs to be imported into the server.  The import command is:

certreq.exe –accept “<CertificateResponse.cer>

This will import the generated certificate into the Windows Certificate Store.

Using the Certificates

Now that we have these freshly minted certificates, we need to put them to work in the View environment.  There are a couple of ways to go about doing this.

1. If you haven’t installed the Horizon View components on the server yet, you will get the option to select your certificate during the installation process.  You don’t need to do anything special to set the certificate up.

2. If you have installed the Horizon View components, and you are using a self-signed certificate or a certificate signed from a different CA, you will need to change the friendly name of the old certificate and restart the Connection Server or Security Server services.

Horizon View requires the certificate to have a friendly name value of vdm.  The template that is posted above sets the friendly name of the new certificate to vdm automatically, but this will conflict with any existing certificates. 

1
Friendly Name

The steps for changing the friendly name are:

  1. Go to Start –> Run and enter MMC.exe
  2. Go to File –> Add/Remove Snap-in
  3. Select Certificates and click Add
  4. Select Computer Account and click Finish
  5. Click OK
  6. Right click on the old certificate and select Properties
  7. On the General tab, delete the value in the Friendly Name field, or change it to vdm_old
  8. Click OK
  9. Restart the View service on the server

2

Certificates and Horizon View Composer

Unfortunately, Horizon View Composer uses a different method of managing certificates.  Although the certificates are still stored in the Windows Certificate store, the process of replacing Composer certificates is a little more involved than just changing the friendly name.

The process for replacing or updating the Composer certificate requires a command prompt and the SVIConfig tool.  SVIConfig is the Composer command line tool.  If you’ve ever had to remove a missing or damaged desktop from your View environment, you’ve used this tool.

The process for replacing the Composer certificate is:

  1. Open a command prompt as Administrator on the Composer server
  2. Change directory to your VMware View Composer installation directory
    Note: The default installation directory is C:\Program Files (x86)\VMware\VMware View Composer
  3. Run the following command: sviconfig.exe –operation=replacecertificate –delete=false
  4. Select the correct certificate from the list of certificates in the Windows Certificate Store
  5. Restart the Composer Service

3

A Successful certificate swap

At this point, all of your certificates should be installed.  If you open up the View Administrator web page, the dashboard should have all green lights.  If you do not see all green lights, you may need to check the health of your certificate environment to ensure that the Horizon View servers can check the validity of all certificates and that a CRL hasn’t expired.

If you are using a certificate signed on an internal CA for servers that your end users connect to, you will need to deploy your root and intermediate certificates to each computer.  This can be done through Group Policy for Windows computers or by publishing the certificates in the Active Directory certificate store.  If you’re using Teradici PCoIP Zero Clients, you can deploy the certificates as part of a policy with the management VM.  If you don’t deploy the root and intermediate certificates, users will not be able to connect without disabling certificate checking in the Horizon View client.