The discussion in the last post of this series focused on getting the vCenter Server virtual appliance ready so the setup wizard could be run. In order to prepare the appliance to run the setup wizard, the following tasks needed to be completed:
-
Accepting the EULA
-
Configuring the network settings
Although it is not essential to running the setup wizard, the default root password was changed.
Now that the appliance’s basic configuration is done, it’s time to run the setup wizard and configure the vCenter application. The setup wizard will take care of the following tasks:
-
Configuring the database. Administrators will have the option to use the built-in PostgreSQL database or an external Oracle database. Microsoft SQL Server and IBM DB2 are not supported.
-
Configure the Single Sign-On Service for the appliance. Both embedded and external SSO are supported.
-
Join the appliance to an Active Directory Domain
-
Configure a time source for the appliance
It is very important to have completed the network setup and have assigned a hostname before starting the setup wizard as the appliance will generate self-signed SSL certificates that are used for securing the various services on the appliance. If you change the hostname after these certificates are generated, the services may not work properly. I had problems with this particular issue when working with the appliance in my lab.
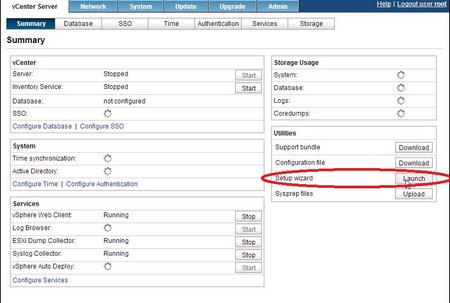
Starting the Wizard
The Setup Wizard is located on the main dashboard of the appliance’s management interface under utilities. Click Launch to restart the wizard.
The first screen of the wizard is the Configure Options screen. The options on this screen will direct how the wizard will run. The options that are available are:
- Configure with default settings – This option configures the appliance with an embedded database and SSO instances. Active Directory and Time Sync are not configured.
- Upgrade from Previous Version – This option is for upgrading an earlier version of the vSphere appliance to 5.5. This requires a key exchange with the older appliance.
- Upload Configuration File – Administrators can provide a configuration file that contains the configuration settings for the database, single sign-on, and Active Directory. Creating and using this file will not be covered in this article (but may be covered in future articles), but documentation may be found here: http://pubs.vmware.com/vsphere-55/index.jsp#com.vmware.vsphere.install.doc/GUID-67BC70A3-B160-4D62-88A6-925AB0C9043D.html
- Set Custom Configuration – The wizard will display screens for configuring the database, single sign-on, Active Directory Authentication, and time sync services.
For this section, the Set Custom Configuration will be used.
Database
The first screen of the custom wizard is configuring the database. The two options that you can select are:
-
Embedded – This is a version of vPostgres that is located on the appliance. If this option is selected, there is no further configuration needed.
-
Oracle – This is an Oracle database instance located on another server. If this option is selected, a server name, TCP Port number, Instance name, and login information. This option is currently the only supported option for using the appliance with environments that are larger than 100 hosts and/or 3000 virtual machines.
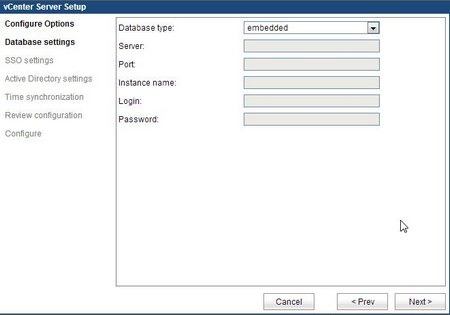
Select the database option that is best suited for the environment and then click next to continue. The embedded database was selected for the test environment as there was no Oracle database in the environment.
When you click next, the appliance will verify the configuration before moving onto the next step.
Single Sign-On
The next screen on the wizard is for configuring the Single Sign-On (SSO) service. This service, which was introduced in vSphere 5.1, has been redesigned in vSphere 5.5. This component provides identity management for administrators and applications that interact with vSphere, and it can be configured to work across vCenters and applications in multiple locations.
Like the database, there are two options for configuring SSO. These options are:
-
Embedded – The SSO service is managed on the appliance.
-
External – The SSO service looks to an SSO instance running on another server. Having the time on all SSO servers is important if this option is being used.
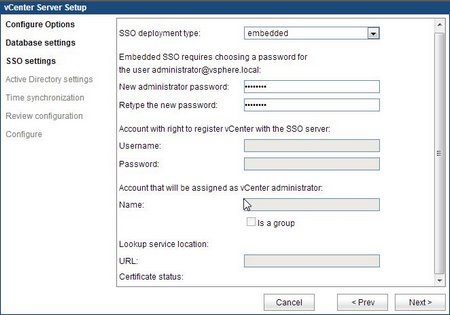
A password for the administrator@vsphere.local account will need to be entered if the embedded option is selected. To use the external option, an SSO administrator account and URL to the lookup service will need to be entered as part of the configuration.
The embedded SSO was used when setting up this test lab.
Active Directory Settings
The next screen on the wizard is for configuring Active Directory in the appliance. To set up Active Directory, check the “Active Directory Enabled” checkbox and fill in the following details:
-
Domain Name – this is the domain name of the domain. If the name of the local domain is testdomain.local, then that is what would be entered into the domain name field.
-
Administrator User – User account with rights to join the appliance to the domain.
-
Adminsitrator Password – Password for the user account with rights to join the domain
NOTE: In order to successfully configure Active Directory, the appliance needs to be configured with a fully qualified domain name as the hostname (see the Configuring the Network Settings section in this post).

The appliance will verify the domain and account information when moving onto the next step. If it fails,it will return an error message and return to the settings page to verify the data that was entered.
If Active Directory is successfully configured, it will automatically configure the appliance’s time synchronization to use Active Directory as a time source and skip to the Review Settings page.
Please be aware that this is only the first part of configuring Active Directory authentication in the vCenter Server Appliance. There are additional steps that will need to be taken after logging into the vCenter Web Client. Those steps will be covered in a future post.
Time Synchronization
The final configuration screen of the wizard is setting up time synchronization. If the appliance is set up with Active Directory enabled, this screen will be skipped and the appliance will be configured to use Active Directory as the time source.
There are four options on this screen, but only three of them are available to be selected. Those options are:
-
No Synchronization – Exactly what it says on the tin.
-
NTP Synchronization – The appliance will retrieve the time for one or more NTP servers such as us.pool.ntp.org.
-
VMware Tools Synchronization – The appliance will retrieve the time from the vSphere hosts through VMware Tools
-
Active Directory Synchronization is an option on this screen, but it is disabled. This is automatically selected and configured if the appliance is joined to an Active Directory domain.

Select the option that best fits the environment and click next to move onto reviewing the settings for the appliance.
Review Configuration
Like any good software package, there is a chance to review the configuration one final time before it is applied. If something isn’t configured correctly, it can be changed by going back to the correct page. If everything is right, the configuration can be applied by clicking Start.
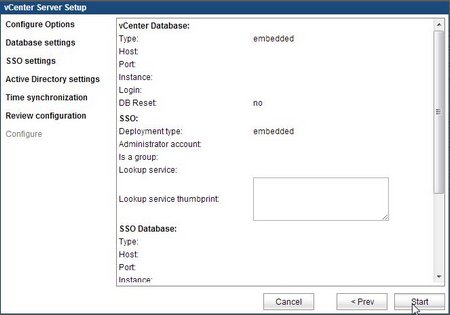
When the process to apply the configuration starts, the appliance will log out any users and reboot. During the reboot, the appliance will generate self-signed certificates for the vCenter Server and SSO, the Inventory Service, and the Log Browser. It’s important to make sure you have the correct fully-qualified domain name and IP address configured on the appliance before the self-signed certificates are generated. I ran into a lot of issues changing the appliance’s name after the Setup Wizard was run as the SSO and Inventory services would not run if the certificate didn’t match the hostname. Regenerating the certificates did not resolve this issue either.
The next article in this series will cover generating and installing new SSL certificates for the three services that require them – the vCenter Server and SSO, the Inventory Service, and the Log Browser service.
