Now that the vCenter Server Appliance has been imported onto an ESXi host, it’s time to start adding hosts and building clusters, right? Well, not so fast. The install process might be significantly easier compared to vCenter for Windows, but that doesn’t mean that the appliance is ready for us just because you’ve imported it and turned it on.
Instructions for getting the appliance onto an ESXi host were covered in the last post. Now that it is there, some basic configuration tasks will need to be performed before the setup wizard can be run. The setup wizard will take care of handling the Single Sign-On setup, database configuration, and Active Directory and time-sync tasks, and that will be covered in the next post.
So what tasks need to be completed before the setup wizard can be run? There are a few:
-
Time zone configuration
-
Network Setup
-
Accepting the EULA
-
Changing the Admin Password
Only after these tasks have been taken care of can you start the setup wizard that configures Single Sign-On, Active Directory Integration, the database, and time-sync. Those items, and the setup wizard, will be covered in the next post.
So you’ve got the appliance imported…now what?
Once the appliance has been imported, the appliance will need to be turned on. It may have been powered on automatically if you selected that option during the import process. The next thing to do is open the console through the vSphere Client. The console is necessary for one of the steps in setting the appliance up.
The first configuration step that will need to be performed is one that cannot be done through the web interface – setting up the time zone. There is an option from the console screen to select a new time zone, however, this does not appear to work. The screen flashes black and then goes back to the main console screen.
Logging into the console will be required to change the time zone. You will need to take the following steps to complete this task:
-
Select Login and press enter
-
Log in as root. The default password is vmware.

-
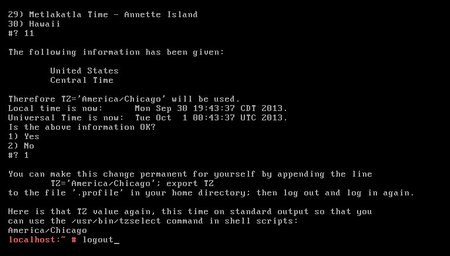
Enter the tzselect command. This will launch a guided time zone selection utility where you select your continent, country, and then time zone.

-
Follow the prompts to select your continent, country, and time zone. For example, if you’re going to select the Central (US) time zone, you would select 2 (America), 49 (United States), 11 (Central). Press 1 to confirm.
-
Type logout to return to the blue console screen.
Logging into the Management Interface
Once the time zone has been set, you can move on to logging into the management interface. This is a web-based interface that provides a way to manage some systems tasks without having to remember the commands to do them from the CLI. It also provides a wizard-based method for configuring the application.
The vCenter Server Appliance actually contains two web interfaces. There is the vCenter Client Web Interface, which is a web-based version of the vSphere C# client, and the management interface that allows an administrator to configure the client. The management interface is the one that we’ll need to log into in order to complete the basic setup.
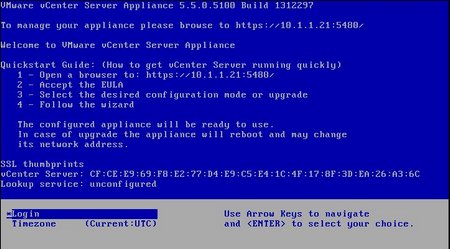
This appliance is newly installed in the environment, and no network configuration has been done yet. The appliance is set up to retrieve an IP Address and other network settings from DHCP, and no host name has been assigned. The IP address will need to be retrieved from somewhere in order to log into this device. Thankfully, that information is displayed twice on the console.
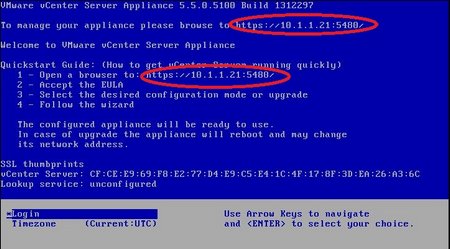
Location of IP Address on console, circled in red
With the IP address in hand, it is time to log in to the management interface. To do that, take the following steps:
-
Open your favorite web browser.
-
Browse to https://<IPAddress>:5480 <-note that it is https and not http
-
Accept any certificate warnings
-
Log in as root with vmware as the password
-
Upon the first login, a screen to accept the EULA will come up. Check the “Accept the License Agreement” box and click next.

-
The setup wizard will launch after the EULA is accepted. Click cancel. The setup wizard will need to be run later in the process.
Changing the Administrator Password
Changing the default root password is one of the first things that should be done on any new system – especially one that is central to the administration of an environment like vCenter Server. A secure, complex password should be used for this account, and it should be stored in a safe place such as a password vault.
To change the root password:
-
Click on the Admin tab.

-
Type in the current password
-
Type in a new administrator password and confirm the new administrator password
-
In order to successfully change the root password, one of two things needs to happen:
A. Password expiration needs to be turned off
B. An email address needs to be entered to send password expiration reminders -
Click submit to change the password.
The system will not log the root account out after the password has been changed.
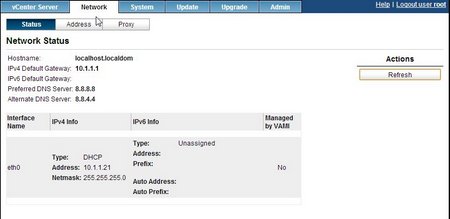
Configuring the Network Settings
The final configuration task that needs to be completed before the setup wizard can be run is configuring the appliance’s network interface. This is handled on the network tab. The appliance is set up to use DHCP when it is first imported into the environment. That should be changed to a static IP and have a hostname assigned. The appliance will support both IPv4 and IPv6, but I will only cover the IPv4 setup. The IPv6 fields can be left blank if that protocol is not used in your environment.
This step needs to be completed before the setup wizard is run because the appliance will generate SSL certificates on the first reboot after the setup wizard runs.
To change the network settings:
-
Click on the network tab. This will bring up the network status screen where the current IP configuration can be viewed.
-
Click on the Address button. This will bring up the screen to change the network settings.
-
Change the IPv4 Address Type to Static. This will allow the network properties to be edited.

-
Enter a fully-qualified domain name in the Hostname field.
-
Enter the IPv4 Default Gateway in the IPv4 Default Gateway Field.
-
Enter the Preferred and Alternate DNS servers in the appropriate fields.
-
Enter the IPv4 Address and netmask in the appropriate fields.
-
IPv6 cannot be disabled on the appliance. Set the IPv6 Address Type to Auto if that protocol is not used in your environment.
-
Click Save Settings.
Anyone logged into the appliance when the network settings are updated will be logged out. To reconnect to the appliance to run the setup wizard, connect to https://<NewIPAddress>:5480 or https://<appliancehostname>:5480.
That covers the basic setup, and the appliance is ready to run the setup wizard to configure SSO, the appliance database, and Active Directory configuration. Those steps will be covered in the next post.

Pingback: vCenter Server Virtual Appliance Part 4 – Running the Setup Wizard | Sean's IT Blog