Tech conferences always bring announcements about new products, partnerships, and capabilities. This year’s Nutanix .Next conference is no exception, and it is starting off with a huge announcement about Omnissa Horizon.
Omnissa Horizon is adding support for Nutanix AHV, providing customers building on-premises virtual desktops and applications environments with the choice of hypervisor for their end-user computing workloads.
Horizon customers will also have the opportunity to participate in the Beta of this new feature. Signup for the beta is available on the Omnissa Beta site.
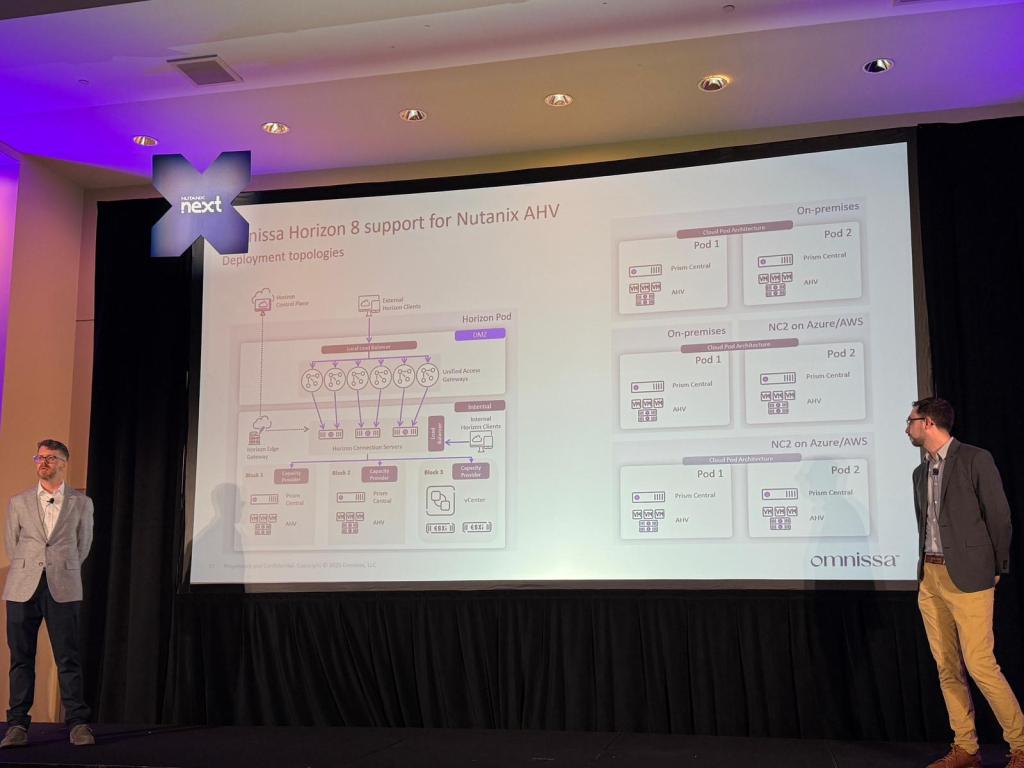
I’m not at the .Next conference this week, but I have heard from attendees that the Horizon on AHV session was well attended and included a lot of technical details including a reference architecture showing Horizon running on both Nutanix AHV and VMware vSphere in on-premises and cloud scenarios. The session also covered desktop provisioning, and Horizon on Nutanix will include a desktop provisioning model similar to “Mode B Instant Clones” using Nutanix’s cloning technologies.
Horizon on AHV reference architecture. Picture courtesy of Dane Young
My Thoughts
So what do I think about Horizon on Nutanix AHV? I’m excited for this announcement. Now that Omnissa is an independent company, they have the opportunity to diversify the platforms that Horizon supports. This is great for Horizon customers who are looking at on-premises alternatives to VMware vSphere and VCF in the aftermath of the Broadcom acquisition.
I have a lot of technical questions about Horizon on Nutanix, and I wasn’t at .Next to ask them. That’s why I’m signing up for the beta and planning to run this in my lab.
I’ve seen some great features added to both Horizon and Workspace ONE since they were spun out into their own company. These include support for Horizon 8 on VMware Cloud Director and Google Cloud and the Windows Server Management feature for Workspace ONE that is currently in beta.
As I’ve started building more GPU-enabled workloads in my home lab, I’ve found myself repeating a few steps to get the required software installed. It involved multiple tools, and I was referencing multiple sources in the vendor documentation.
I wanted to pull everything together into one document – both to document my process so I can automate it and also to share so I can help others who are looking at the same thing.
So this post covers the steps for installing and configuring the NVIDIA drivers, CUDA toolkit, and/or the Container Toolkit on vSphere virtual machines.
Install NVIDA Driver Prequisites
There are a few prerequisites required before installing the NVIDIA drivers. This includes installing kernel headers, the programs required to compile the NVIDIA drivers, and disabling Nouveau. We will also install the NVIDIA CUDA Repo.
#Install Prerequisites
sudo apt-get install xfsprogs wget git python3 python3-venv python3-pip p7zip-full build-essential -y
sudo apt-get install linux-headers-$(uname -r) -y

#Disable Nouveau
lsmod | grep nouveau

cat <<EOF | sudo tee /etc/modprobe.d/blacklist-nouveau.conf
blacklist nouveau
options nouveau modeset=0
EOF
sudo update-initramfs -u
Reboot the system after the initramfs build completes.
sudo reboot
Install the NVIDIA Drivers
NVIDIA includes .run and .deb installer options for Debian-based operating systems. I use the .run option because that is what I am most familiar with. The run file will need to be made executable as it does not have these permissions by default. I also install using the --dkms flag so the driver will be recompiled automatically if the kernel is updated.
The vGPU drivers are distributed through the NVIDIA Enterprise Software Licensing portal through the NVIDIA Virtual GPU or AI Enterprise product sets and require a license to use If you are using PCI Passthrough instead of GRID, you can download the NVIDIA Data Center/Tesla Drivers from the data center driver download page.
I am using the NVAIE product set for some of my testing, so I will be installing a vGPU driver. The steps to install the Driver, CUDA Toolkit, and Container Toolkit are the same whether you are using a regular data center driver or the vGPU driver. You will not need to configure any licensing when using PCI Passthrough.
The drivers need to be downloaded, copied over to the virtual machine, and have the executable flag set on the file.
Click OK for any messages that are displayed during install. Once the installation is complete, reboot the server.
After the install completes, type the following command to verify that the driver is installed properly.
nvidia-smi
You should receive an output similar to the following:
Installing the CUDA Toolkit
Like the GRID Driver installer, NVIDIA distributes the CUDA Toolkit as both a .run and .deb installer. For this step, I’ll be using the .deb installer as it works with Debian’s built-in package management, can handle upgrades when new CUDA versions are released, and contains a multiple meta package installation options that are documented in the CUDA installation documentation.
By default, the CUDA toolkit installer will try to install an NVIDIA driver. Since this deployment is using a vGPU driver, we don’t want to use the driver included with CUDA. NVIDIA is very prescriptive about which driver versions work with vGPU, and installing a different driver, even if it is the same version, will result in errors.
The first step is to install the CUDA keyring and enable the contrib repository. The keyring file contains the repository information and the GPG signing key. Use the following commands to complete this step:
The next step is to update our Apt-Get repos and install the CUDA Toolkit. The CUDA toolkit requires a number of additional packages that will be installed alongside the main application.
The package installer does not add CUDA to the system PATH variable, so we need to do this manually. The way I’ve done this is to create a login script that applies for all users using the following command. The CUDA folder path is versioned, so this script to set the PATH variable will need to be updated when the CUDA version changes.
Once our script is created, we need to apply the updated PATH variable and test our CUDA Toolkit installation to make sure it is working properly.
source /etc/profile.d/nvidia.sh
nvcc --version
You should receive the following output if the PATH variable is updated properly.
If you receive a command not found error, then the PATH variable has not been set properly, and you need to review and rerun the script that contains your EXPORT command.
NVIDIA Container Toolkit
If you are planning to use container workloads with your GPU, you will need to install the NVIDIA Container Toolkit. The Container Toolkit provides a container runtime library and utilities to configure containers to utilize NVIDIA GPUs. The Container Toolkit is distributed from an apt repository.
Note: The CUDA toolkit is not required if you are planning to only use container workloads with the GPU. An NVIDIA driver is still required on the host or VM.
The first step for installing the NVIDIA Container Toolkit on Debian is to import the Container Toolkit apt repository.
Note: Other container runtimes are supported. Please see the documentation to see the supported container runtimes and their configuration instructions.
After restarting your container runtime, you can run a test workload to make sure the container toolkit is installed properly.
sudo docker run --rm --runtime=nvidia --gpus all ubuntu nvidia-smi
Using NVIDIA GPUs with Docker Compose
GPUs can be utilized with container workloads managed by Docker Compose. You will need to add the following lines, modified to fit your environment, to the container definition in your Docker Compose file. Please see the Docker Compose documentation for more details.
Your machine will need to check out a license if NVIDIA vGPU or NVAIE are being used, and the NVIDIA vGPU driver will need to be configured with a license server. The steps for setting up a cloud or local instance of the NVIDIA License System are beyond the scope of this post, but they can be found in the NVIDIA License System documentation.
Note: You do not need to complete these steps if you are using the Data Center Driver with PCI Passthrough. Licensing is only required if you are using vGPU or NVAIE features.
After generating and downloading the client configuration token, it will need to be placed onto your virtual machine. The file needs to be copied from your local machine to the /etc/nvidia/ClientConfigToken directory. This directory is locked down by default, and it requires root or sudo access to perform any file operations here. So you may need to copy the token file to your local home directory and use sudo to copy it into the ClientConfigToken directory. Or you can place the token file on a local web server and use wget/cURL to download it.
The final step is to configure vGPU features. This is done by editing the gridd.conf file and enabling vGPU. The first step is to copy the gridd.conf.template file using the following command.
The next step is to edit the file, find the line called FeatureType, and change the value from 0 to 1.
sudo nano /etc/nvidia/gridd.conf
Finally, restart the NVIDIA GRID daemon.
sudo systemctl restart nvidia-gridd
You can check the service status with the sudo systemctl status nvidia-gridd command to see if a license was successfully checked out. You can also log into your license service portal and review the logs to see licensing activity.
Sources
While creating this post, I pulled from the following links and sources.
Back in December 2023, Hock Tan announced that he would be looking to divest the entity that is the “soon-to-be-formerly-known-as the VMware EUC Business Unit.” Speculation ran rampant about possible buyers until the end of February when KKR announced that they had agreed to buy the EUC business for $3.8 billion USD and that it would become a standalone business.
That also led to a new round of speculation. What would the new entity be called? When would they stand on their own? How would Broadcom’s “Day 2” impact EUC during the divestiture process?
The future of “the business unit formerly known as VMware EUC” is now starting to come into focus as we get answers to these questions. While the divestiture is still in process and the expected closing date is unknown, we now formally know the new company’s name – Omnissa.
Today (Monday, May 6th 2024), the Omnissa website and other selected sites have started to go live. While the acquisition has not closed, Broadcom has started the process of migrating the legacy VMware systems into Broadcom’s systems, and the EUC systems will be migrated into standalone systems to help support the future independent organization. Broadcom has posted a KB for this here: https://knowledge.broadcom.com/external/article?legacyId=97841
The following sites are live as of the time of this post, although not all features and functionality might be working.
In addition to the above links, redirects from the VMware website are being put in place for Horizon and Workspace ONE focused pages so that old URLs will continue to work.
So what do I think of the new branding? The first time I heard the name, I wondered who the Warhammer 40K fan was on the marketing team as Omnissa sounds a lot like the name of something from that game universe.
The more I think about the name and the branding that was announce today, the more I like it. It feels all-encompassing…like it pulls together all of the former VMware EUC products. And I am a big fan of the Omnissa Mission Statement. It is very customer and end-user focused, and I think it directly ties back to the product portfolio and the capabilities they can deliver.
So congratulations to the Omnissa team on the first step of your new brand launch. I’m looking forward to seeing more as you take the next steps on your independent journey.
(Note: I am not a Warhammer 40K fan…but as a general science-fiction and speculative fiction fan, I am familiar with some of that series lore. The only Warhammer I like comes from a completely different science fiction universe.)
Back in August 2023, I had the pleasure of presenting two VMware Explore sessions about home labs. While preparing for those sessions, I realized that I hadn’t done a home lab update post in a long time. In fact, my last update post was four years ago in February 2020.
And a lot has changed in my lab. The use cases, architecture, the hardware, and even my areas of focus have changed significantly in the last four years. With VMware being acquired by Broadcom and my desire to retool and expand my skillsets, my home lab will be more important than ever. I will be using it as a tool to help achieve my goals and find my next path.
And while I was originally going to write about the lab infrastructure changes, I decided that my original post just wasn’t right. My home lab is practically a private cloud, and the tone of the post unintentionally came off as bragging.
That didn’t sit right with me, so I decided to scrap that post and start over. I want to focus on workloads and applications instead of hardware and infrastructure solutions, and I want to elevate some of the open-source projects that I’m using as learning tools.
And when I talk about hardware or infrastructure, it’s going to be about how that hardware supports the specific application or workload.
Home Lab Use Cases
I think it’s very important to talk about my lab use cases.
I had a slide that I used in two of my VMworld VMware Explore sessions that summed up my home lab use cases:
I really want to focus on the last two use cases on that slide: self-hosting open-source solutions and Minecraft. The latter has really driven the “roadmap” for my lab by forcing me to look for open-source solutions. I don’t have a budget, so I’ve been forced to look at open-source solutions to support my kids’ Minecraft servers.
Minecraft isn’t the only thing I’m self-hosting, though. I’ve found some awesome tools thanks to the r/self-hosted sub-Reddit, and I’ve used some of the tools there to fill in the gaps in my infrastructure.
Most of these solutions are containerized or offer a container-based option. I’m using containers whenever possible because it makes deploying and maintaining the application and its dependencies much easier than managing binary installs. Each application stack gets its own Debian-based VM, and I am using Traefik as my reverse proxy and SSL offload manager of choice.
I haven’t jumped into Kubernetes yet as I’m still getting comfortable with containers, and self-hosting Kubernetes adds another layer of complexity to my lab. It is on my to-do list.
All the solutions I’m using would be deserving of their own posts, but in the interest of time and wordcount, I’ll keep it fairly high level today.
Vaultwarden
There was a time, a long time ago, when I was a Lastpass family customer. It got harder to justify the yearly cost of Lastpass when self-hosted alternatives like Bitwarden were available (and…if I’m being honest…my family was not using the service). The Lastpass breach and security issues came to light about six months after I had cancelled my subscription and migrated my vault out, but it only justified my decision to move on.
I was originally using the self-hosted Bitwarden container. But I recently switched to Vaultwarden so I could start offering password vaults to the rest of my family as they are seeing the need for a password vault service.
Vaultwarden is one of the most important services in my lab. This service contains critical data, and I need to make sure it is backed up. I’m using a combination of this Vaultwarden backup container and Restic to protect the data in this application.
MinIO
MinIO is one of the few applications that I’ve deployed with infrastructure dependencies. I originally deployed MinIO in my lab when I was testing VMware Data Services Manager (DSM) as that product required S3-compatible storage.
I have a 3-node MinIO cluster in my lab. Each MinIO node has two data volumes, so I have a total of 6 data disks across my 3 nodes.
This is one of the few applications in my lab that is tied to specific hosts and hardware. Each MinIO node data volume is sitting on a dedicated local SSD, so each node is tied to an ESXi host in a workload cluster. This setup allows me to use erasure coding and provides some degree of data redundancy, but it makes host management operations a little more complex because I must shut down the MinIO node on a host before I can perform any maintenance operations.
Even though I’m no longer testing DSM in my lab, I still have MinIO deployed. I’m using it as the backend for other services in my lab that I will be talking about later in this post.
Wiki.JS
Home labs are rarely documented. This is something I’m trying to improve on with my lab as I’ve had a few processes that I’ve had to figure out or reverse engineer from looking at my shell/command history. I used to use Confluence SaaS free tier for documenting my home network, but SSO was a $30 per month add-on.
I also wanted a self-hosted option. I looked at a few wiki options, including Bookstacks, Dokuwiki, and a few others. But I’m also kind of picky about my requirements and wanted something that supported SSO out of the box and used PostgreSQL.
So I settled on wiki.js as my solution because it is open source, met all my technical requirements, and it fit in my budget.
I’m not taking full advantage of WikiJS yet. My focus has been importing content from Confluence and testing out the SSO features. But I plan to add more lab documentation and use it for some of my programming and lab side projects in the future.
Grafana Loki and Promtail
I’ve needed a log management solution for my fleet of Minecraft servers for a while now. Log management has been an issue on those, and some method to easily search the logs is kind of a requirement before I let my kids share the servers with their friends.
There are a lot of open-source solutions in this space, but I am settling on the Grafana stack. I’m starting with this stack because it seems to be a well-integrated stack for performance monitoring, log aggregation, and creating dashboards. Time will tell on that as I am just getting started with Grafana Loki. I have a small instance deployed today to get my Promtail config ironed out, and I will be redeploying it as I roll it out to the rest of my lab.
One thing I like about some of the newer log management systems is that they can use S3-compatible storage for log data. Loki isn’t the only solution that can do this but being a part of the Grafana stack set it apart in my mind and helped make it my first choice.
I’m using the Promtail binary for my Minecraft servers, and getting that config set up properly has been a pain. The documentation is very high level, and as far as I can tell, doesn’t include very many example configs to start from. Some of the issues I had to work through are scraping the systemctl journal, which required adding the promtail service user to a systemctl-journald group and getting the hostname and IP address added to all forwarded logs. The documentation covered some of what I needed, but there were some significant gaps in my opinion. It took a lot of trial, error, and experimentation to get where I wanted to be.
I need to write a longer blog post to talk about my setup and how I worked around some of the issues I faced once I get this rolled out into “production” and get some dashboards built. I will also be looking at Grafana’s version of Prometheus for performance monitoring in a later phase.
OwnCloud Infinite Scale
Have you ever exceeded the limits of the free tiers that Microsoft and Google offer on OneDrive or Google Drive? Or needed a Dropbox-like service that was self-hosted to meet data sovereignty or compliance requirements?
OwnCloud Infinite Scale (OCIS) is an open-source ground-up rewrite of OwnCloud Server using the Go programming language. It is a drop-in replacement for OneDrive, Google Drive, Dropbox and similar solutions. The client app supports files-on-demand (although this feature is experimental on MacOS). The server supports integration with multiple web-based office suites, OpenID Connect for SSO, and S3-compatible storage.
I use it for some of my file storage needs, especially the stuff that I don’t want to put on OneDrive or transferring data from my laptop to my lab. I expect to use the Spaces feature to replace some of my lab file servers and QNAP virtual appliances in my lab.
DDNS-Route53
DDNS-Route53 is a Go application that allows you to build your own Dynamic DNS service using AWS Route53. I was getting tired of having multiple dynamic DNS services tied to different domains, and I’ve started to standardize all my domains on Route53 and use this service to replace the few dynamic DNS services that I currently use.
Conclusion
These are just a few of the open-source projects I’ve been using in my lab. I have a few more that I’ve been testing out that I will talk about in future posts.
Open-source solutions are a great way to get more utilization out of your home lab while building or enhancing your technical skills. I’ll be talking more about this topic at the Wisconsin VMUG Usercon in April 2024. If you’re going to be there, please stop by my session.


You must be logged in to post a comment.