Minimal Touch VDI Image Building With MDT, PowerCLI, and Chocolatey

Recently, Mark Brookfield posted a three-part series on the process he uses for building Windows 10 images in HobbitCloud (Part 1, Part 2, Part 3). Mark has put together a great series of posts that explain the tools and the processes that he is using in his lab, and it has inspired me to revisit this topic and talk about the process and tooling I currently use in my lab and the requirements and decisions that influenced this design.

Why Automate Image Building?

Hand-building images is a time-intensive process.  It is also potentially error-prone as it is easy to forget applications and specific configuration items, requiring additional work or even building new images depending on the steps that were missed.  Incremental changes that are made to templates may not make it into the image building documentation, requiring additional work to update the image after it has been deployed.

Automation helps solve these challenges and provide consistent results.  Once the process is nailed down, you can expect consistent results on every build.  If you need to make incremental changes to the image, you can add them into your build sequence so they aren’t forgotten when building the next image.

Tools in My Build Process

When I started researching my image build process back in 2017, I was looking to find a way to save time and provide consistent results on each build.  I wanted a tool that would allow me to build images with little interaction with the process on my part.  But it also needed to fit into my lab.  The main tools I looked at were Packer with the JetBrains vSphere plugin and Microsoft Deployment Toolkit (MDT).

While Packer is an incredible tool, I ended up selected MDT as the main tool in my process.  My reason for selecting MDT has to do with NVIDIA GRID.  The vSphere Plugin for Packer does not currently support provisioning machines with vGPU, so using this tool would have required manual post-deployment work.

One nice feature of MDT is that it can utilize a SQL Server database for storing details about registered machines such as the computer name, the OU where the computer object should be placed, and the task sequence to run when booting into MDT.  This allows a new machine to be provisioned in a zero-touch fashion, and the database can be populated from PowerShell.

Unlike Packer, which can create and configure the virtual machine in vCenter, MDT only handles the operating system deployment.  So I needed some way to create and configure the VM in vCenter with a vGPU profile.  The best method of doing this is using PowerCLI.  While there are no native commandlets for managing vGPUs or other Shared PCI objects in PowerCLI, there are ways to utilize vSphere extension data to add a vGPU profile to a VM.

While MDT can install applications as part of a task sequence, I wanted something a little more flexible.  Typically, when a new version of an application is added, the way I had structured my task sequences required them to be updated to utilize the newer version.  The reason for this is that I wasn’t using Application Groups for certain applications that were going into the image, mainly the agents that were being installed, as I wanted to control the install order and manage reboots. (Yes…I may have been using this wrong…)

I wanted to reduce my operational overhead when applications were updated so I went looking for alternatives.  I ended up settling on using Chocolatey to install most of the applications in my images, with applications being hosted in a private repository running on the free edition of ProGet.

My Build Process Workflow

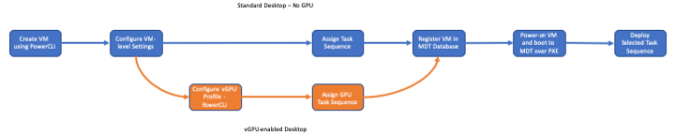
My build workflow consists of 7 steps with one branch.  These steps are:

  1. Create a new VM in vCenter
  2. Configure VM options such as memory reservations and video RAM
  3. GPU Flag Only – Add a virtual GPU with the correct profile to the VM.
  4. Identify Task Sequence that will be used.  There are different task sequences for GPU and non-GPU machines and logic in the script to create the task sequence name. Various parameters that are called when running the script help define the logic.
  5. Create a new computer entry in the MDT database.  This includes the computer name, MAC address, task sequence name, role, and a few other variables.  This step is performed in PowerShell using the MDTDB PowerShell module.
  6. Power on the VM. This is done using PowerCLI. The VM will PXE boot to a Windows PE environment configured to point to my MDT server.

Build Process

After the VM is powered on and boots to Windows PE, the rest of the process is hands off. All of the MDT prompts, such as the prompt for a computer name or the task sequence, are disabled, and the install process relies on the database for things like computer name and task sequence.

From this point forward, it takes about forty-five minutes to an hour to complete the task sequence. MDT installs Windows 10 and any drivers like the VMXNET3 driver, install Windows Updates from an internal WSUS server, installs any agents or applications, such as VMware Tools, the Horizon Agent, and the UEM DEM agent, silently runs the OSOT tool, and stamps the registry with the image build date.

Future Direction and Process Enhancements

While this process works well today, it is a bit cumbersome. Each new Windows 10 release requires a new task sequence for version control. It is also difficult to work tools like the OSDeploy PowerShell scripts by David Segura (used for slipstreaming updated into a Windows 10 WIM) into the process. While there are ways to automate MDT, I’d rather invest time in automating builds using Packer.

There are a couple of post-deployment steps that I would like to integrate into my build process as well. I would like to utilize Pester to validate the image build after it completes, and then if it passes, execute a shutdown and VM snapshot (or conversion to template) so it is ready to be consumed by Horizon. My plan is to utilize a tool like Jenkins to orchestrate the build pipeline and do something similar to the process that Mark Brookfield has laid out.

The ideal process that I am working towards will have multiple workflows to manage various aspects to the process. Some of these are:

1. A process for automatically creating updated Windows 10 ISOs with the latest Windows Updates using the OSDeploy PowerShell module.

2. A process for creating Chocolatey package updates and submitting them to my ProGet repository for applications managed by Chocolatey.

3. A process to build new images when Windows 10 or key applications (such as VMware Tools, the Horizon Agent, or NVIDIA Drivers) are updated. This process will ideally use Packer as the build tool to simplify management. The main dependency for this step is adding NVIDIA GRID support for the JetBrains Packer vSphere Plug-in.

So this is what I’m doing for image builds in my lab, and the direction I’m planning to go.

Using PowerCLI to Prepare a VM for SQL Server

SQL Server is one of those applications where performance can be greatly impacted by the initial server configuration.  One of the big contributing factors to this is storage configuration.  If this isn’t optimized at the VM or the storage array level, performance will suffer, and an entire book has been dedicated to the subject.

SQL Server may seem ubiquitous in many environments because many applications require a SQL database for storing data.  And in many cases, a new application means deploying a new database server.

Because SQL can require a virtual machine setup that follows a different baseline, each new SQL Server will either need to be deployed from a custom template for SQL or hand-crafted from whatever base template it was deployed from.  If you want to keep your template count to a minimum but still avoid having to hand craft your SQL Servers, we need to turn to PowerCLI and PowerShell 4.0.

Windows Server 2012 R2 and PowerShell 4.0 introduced a number of new Cmdlets that will assist in preparing a brand new VM to run SQL Server.  These cmdlets handle storage and disk operations, and these new cmdlets will be instrumental in provisioning the additional storage resources that the server needs.

The code for this script is up on Github.

Standard SQL Server Configuration

When you virtualize SQL Server, there are a few best practices that should be done to ensure good performance.  Therefore, we want to ensure that the script to prepare the server for SQL implements these best practices.  Most of these best practices relate to storage configuration and disk layout.

One of the other goals of this process is to ensure consistency.  All SQL Servers should be configured similarly, and drive letters, use of mount points, and installation paths should be the same on all SQL Servers to ease administrative overhead. 

I have a couple of preferences when deploying SQL in my environment.  Each instance will have two dedicated volumes – one for SQL data files and one for SQL logs.  I prefer to use mount points to store the data and log files for my databases and TempDB.  This allows me to keep drive letter assignments consistent across all database servers, and if I need to add an instance to a server, I don’t need to find free drive letters for the additional disks. 

I also like to include the VMDK file name in the volume label.  Drive numbers can change on VMs as drives are added and removed, so adding the VMDK file name to the volume label adds an additional value to check if you need to expand a disk or remove one from production. 

Screenshot of Disk Labels

image

Finally, I like to install SQL Server Management Studio prior to installing the database engine.  This gives me one less feature to worry about when configuring my instance deployments.

There are a couple of things that this job will do when preparing a server to run SQL:

  1. Set CPU and Memory reservations based on the currently assigned resources to guarantee performance
  2. Change the Storage Policy to automatically set all newly attached disks to Online so they can be configured.
  3. Create the following disk layout:
    1. E: – SQL Install location
    2. R: – SQL Data Volume
    3. S: – SQL Backup Volume
    4. T: – SQL Log Volume
  4. Copy SQL Installer files to E:\SQLInstall
  5. Create the following volumes as mount points, and attach them to PVSCSI storage controllers. 
    1. TEMPDB Database File Volume under R:
    2. TEMPDB Log File Volume under T:
  6. Add any SQL admin groups or database owners to the local administrator group
  7. Install SQL Server Management Studio

The script doesn’t add or configure any disks that will be used for the actual SQL Server instances that will be installed on the server.  I have another script that handles that.

Working with Disks

In the past, the only ways to manage disks using PowerShell were using the old command line utilities like fdisk or to use WMI.  That changed with Windows Server 2012 R2, and new disk management commands were included with PowerShell 4.0.

Note: These commands only work against Windows Server 2012 R2 and newer.

These commands will take care of all of the disk provisioning tasks once the VMDK has been added to the server, including initializing the disk, creating the partition, and formatting it with the correct block size.  The PowerShell commands also allow us to define whether the disk will be a mount point or be accessed through a drive letter.

Note: When attaching a disk as a mount point, there are some additional options that need to be selected to ensure that it does not get a drive letter assigned after a reboot.  Please see the code snippet below.

One of the neat things about these new cmdlets is that they use the new CIMSession connection type for PowerShell remoting.  Cmdlets that use CIMSessions are run on the local computer and connect to a WMI instance on the remote machine.  Unlike PSSessions, network connections are only utilized when a command is being executed.

An example of these cmdlets in action is the function to mount a VMDK as a mount point. 

Function Create-MountPoint
{
#Initialize volume, create partition, mount as NTFS Mount Point, and format as NTFS Volume
Param($Servername,$VolumeName,$VolumeSize,$Path,$CimSession)
$VolumeSizeGB = [string]$VolumeSize + "GB"

$partition = Get-Disk -CIMSession $CimSession | Where-Object {($_.partitionstyle -eq "raw") -and ($_.size -eq $VolumeSizeGB)} | Initialize-Disk -PartitionStyle GPT -PassThru | New-Partition -UseMaximumSize -AssignDriveLetter:$False

$disknumber = $partition.DiskNumber
$partitionnumber = $partition.partitionnumber
$diskID = $partition.diskID

Get-Partition -DiskNumber $disknumber -PartitionNumber $partitionnumber -CimSession $CimSession | Format-Volume -AllocationUnitSize 64KB -FileSystem NTFS -NewFileSystemLabel $VolumeName -Confirm:$false
Add-PartitionAccessPath -CimSession $CimSession -DiskNumber $disknumber -PartitionNumber $partitionnumber -AssignDriveLetter:$False
Add-PartitionAccessPath -CimSession $CimSession -DiskNumber $disknumber -PartitionNumber $partitionnumber -AccessPath $Path
Set-Partition -CimSession $CimSession -DiskNumber $disknumber -PartitionNumber $partitionnumber -NoDefaultDriveLetter:$true
}

This function handles configuring a new disk for SQL, including formatting it with a 64KB block size, and attaches it as an NTFS mount point.

If you read through the code, you’ll notice that the disk is configured to not assign a drive letter in multiple places.  While writing and testing this function, all mount points would gain a drive letter when the system was rebooted.  In order to prevent this from happening, the script needed to tell Windows not to assign a drive letter multiple times.

What About Disks for SQL Instances

One thing that this particular script does not do is create the data and log volumes for a SQL instance.  While it wouldn’t be too hard to add that code in and prompt for an instance name, I decided to place that logic in another script.  This allows me to manage and use one script for adding instance disks instead of having that logic in two places.  This also helps keep both scripts smaller and more manageable.

Installing SQL Server

The last step in this process is to install SQL Server.  Unfortunately, that step still needs to be done by hand at this point.  The reason is that the SQL installation requires Kerberos in order work properly, and it throws an error if I try to install using WinRM. 

Simplifying VM Provisioning with PowerCLI and SQL

Virtualization has made server deployments easier, and putting a new server into production can be as easy as right-clicking on a template and selecting Deploy VM and applying a customization spec.

Deploying a VM from a template is just one step in the process.  Manual intervention, or worse – multiple templates, may be required if the new VM needs more than the default number of processors or additional RAM.  And deployment tasks don’t stop with VM hardware.  There may be other steps in the process such as putting the server’s Active Directory account into the correct OU, placing the VM in the correct folder, or granting administrative rights to the server or application owner.

All of these steps can be done manually.  But it requires a user to work in multiple GUIs and even log into the remote server to assign local admin rights.

There is an easier way to handle all of this.  PowerShell, with the PowerCLI and Active Directory plugins, can handle the provisioning process, and .Net calls can be used to add a user or group to the new server’s Administrator group while pulling the configuration data from a SQL database.

The Script

I have a script available on Github that you can download and try out in your environment.   The script, Provision-VM.ps1, requires a SQL database for profile information, which is explained below, PowerCLI, and the Active Directory PowerShell cmdlets.  You will also need two service accounts – an Active Directory user with Administrator permissions in vCenter and an Active Directory user with Domain Administrator permissions.

This script was designed to be used with the vCenter Orchestrator PowerShell module and WinRM.  vCO will provide a graphical front end for entering the script parameters and executing the script.

This script might look somewhat familiar.  I used a version of it in my Week 1 Virtual Design Master submission.

What Provision-VM.ps1 Does

So what exactly does Provision-VM.ps1 do?  Well, it does almost exactly what it says on the tin.  It provisions a brand new VM from a template.  But it does a little more than just deploy a VM from a template.

The exact steps that are taken are:

  1. Query the SQL database for the customization settings that are needed for the profile.
  2. Prestage the computer account in the Active Directory OU
  3. Create a non-persistent Customization Spec
  4. Set the IP network settings for the customization spec
  5. Deploy a new VM to the correct resource pool/cluster/host and datastore/datastore cluster using the specified template based on the details retrieved in step 1.
    Note: The Resource Pool  parameter is used in the script instead of the host parameter because the Resource Pool  parameter encompasses hosts, clusters, and resource pools.  This provides more flexibility than the host parameter.
  6. Add additional CPUs and RAM is specified using the –CPUCount and –RAMCount parameters
  7. Power on VM and customize
  8. Add server owner user account or group to the local administrators group if one is specified using the –Owner parameter.

By using this deployment process along with some other scripts for configuring a server for a specific role after it has been deployed, I’ve been able to reduce the number of templates that need to be managed to 1 per Windows version.

WinRM and Working Around Kerberos Issues

vCenter Orchestrator is a great tool for automation and orchestration, and VMware has developed a PowerShell plugin to extend vCO management to Windows hosts and VMs.  This plugin even uses WinRM, which is Microsoft’ s preferred remote management technology for PowerShell.

WinRM setup for the vCO appliance, which I use in my environments, requires Kerberos to be used when making the remote connection.  I use a single Windows jumpbox to execute all of my PowerShell scripts from one location, so I run into Kerberos forwarding issues when using vCO and PowerShell to administer other systems.

There is a way to work around this, but I won’t spend a lot of time on it since it deserves it’s own post.  However, you can learn more about how the password information is stored and converted into a PowerShell credential from this article on PowerShell.org.

I also put together a little script that creates a password hash file using some of the code in the article above.

SQL-Based Profiles

One of the drawbacks of trying to script server deployments is that it needs to be simple to use without making it too hard to maintain.   I can make all required inputs – cluster or resource pool, datastore, template, etc, – into parameters that the person who runs the script has to enter.  But if you plan on using a script as part of a self-service provisioning model, keeping the number of parameters to a minimum is essential.  This helps limit the options that are available to users when deploying VMs and prevents them from having to worry about backend details like cluster and datastore names.

The tradeoff, in my experience, is that you need to put more into the script to compensate for having fewer parameters.   To do this, you’ll need to create “profiles” of all the customization settings you want to apply to the deployed server and code it directly into the script.

Let’s say you have one vSphere.  The cluster has three VLANs that servers can connect to, two datastore clusters where the server can be stored, and three templates that can be deployed.  To keep the script easy to run, and prevent admins or app owners from having to memorize all the details, you’d need to create 18 different profile combinations to cover the various settings.

This can make the script larger as you’ll need to include all combinations of settings that will be deployed.  It also makes it more likely that any additions or changes could introduce a script breaking bug like a missing curly bracket or quotation mark.

There is another way to reduce the size and complexity of the script while keeping parameters to a minimum – use a SQL database to store the customization settings.  These customization settings would be queried at run-time based on the profile that the end user selects.

The database for this script is a simple single table database.  There is a SQL script on Github to set up a table similar to the one I use in my lab.  If you choose to add or remove fields, you will need to edit the Provision-VM.ps1 file starting around line 106.

Database Schema Screenshotimage

There are two ways that the information can be retrieved from the database.  The first method is to install SQL Server Management Studio for SQL Server 2012 or newer on the server where the script will be executed.  The other is to use .Net to connect to SQL and execute the query.  I prefer the later option because it requires one less component to install.

The code for querying SQL from PowerShell, courtesy of Iris Classon’s blog that is linked above, is:

$dataSource = $SQLServer
$user = "SQL Server User Account"
$pwd = "Password"
$database = "OSCustomizationDB"
$databasetable = "OSCustomizationSettings"
$connectionString = "Server=$dataSource;uid=$user;pwd=$pwd;Database=$database;Integrated Security=False;"
 
$query = "Select * FROM $databasetable WHERE Profile_ID = '$Profile'"
 
$connection = New-Object System.Data.SqlClient.SqlConnection
$connection.ConnectionString = $connectionString
$connection.Open()
$command = $connection.CreateCommand()
$command.CommandText  = $query
 
$result = $command.ExecuteReader()

$ProfileDetails = new-object “System.Data.DataTable”
$ProfileDetails.Load($result)
You may notice that SQL Authentication is used for querying the database.  This script was designed to run from vCO, and if I use the PowerShell plugin, I run into Kerberos issues when using Windows Integrated authentication.  The account used for accessing this database only needs to have data reader rights.

Once the settings have been retrieved from the database, they can be used to determine which template will be deployed, the resource pool and datastore or datastore cluster that it will be deployed to, temporarily modify an existing customization spec NIC mapping settings at runtime, and even determine which OU the server’s AD account will be deployed in.

The benefit of this setup is that I can easily add new profiles or change existing profiles without having to directly edit my deployment script.  This gets changes into production faster.

More to Come…

This is just scratching the surface of deployment tasks that can be automated with PowerShell.  PowerShell 4.0 and Windows Server 2012R2 add a lot of new cmdlets that can automate things like disk setup.

Updated Script – Start-Recompose.ps1

I will be giving my first VMUG presentation on Thursday, September 26th  at the Wisconsin VMUG meeting in Appleton, WI.  The topic of my presentation will be three scripts that we use in our VMware View environment to automate routine and time consuming tasks.

One of the scripts that I will be including in my presentation is the Start-Recompose script that I posted a few weeks ago.  I’ve made some updates to this script to address a few things that I’ve always wanted to improve with this script.  I’ll be posting about the other two scripts this week.

These improvements are:

  • Getting pool information directly from the View LDAP datastore instead of using the Get-Pool cmdlet
  • Checking for space on the Replica volume before scheduling the Recompose operation
  • Adding email and event logging alerts
  • The ability to recompose just one pool if multiple pools share the same base image.

The updated script will still need to be run from the View Connection Server as it requires the View PowerCLI cmdlets.  The vSphere PowerCLI cmdlets and the Quest AD cmdlets will also need to be available.  A future update will probably remove the need for the Quest cmdlets, but I didn’t feel like reinventing the wheel at the time.

The script can be downloaded from github here.

VMware View Pool Recompose PowerCLI Script

Edit – I’ve updated this script recently.  The updated version includes some additional features such as checking to make sure there is enough space on the replica volume to for a successful clone.  You can read more about it here: http://www.seanmassey.net/2013/09/updated-script-start-recomposeps1.html

One of the many hats that I wear at $work is the administration of our virtual desktop environment that is built on VMware View.  Although the specific details of our virtual desktop environment may be covered in another post, I will provide a few details here for background.  Our View environment has about 240 users and 200 desktops, although we only have about 150 people logged in at a given time.  It is almost 100% non-persistent, and the seven desktops that are set up as persistent are only due to an application licensing issue and refresh on logout like our non-persistent desktops.
Two of the primary tasks involved with that are managing snapshots and scheduling pool recompose operations as part of our patching cycle.  I wish I could say that it was a set monthly cycle, but a certain required plugin…*cough* Java *cough*…and one application that we use for web conferencing seem to break and require an update every time there is a slight update to Adobe Air.  There is also the occassional request that a department needs that is a priority and falls outside of the normal update cycle such as an application that needs to be added on short notice.
Our 200 desktops are grouped into sixteen desktop pools, and there are seven Parent VMs that are used as the base images for these sixteen pools.  That seems like a lot given the total number of desktops that we have, but there are business reasons for all of these including restrictions on remote access, department applications that don’t play nicely with ThinApp, and restrictions on the number of people from certain departments that can be logged in at one time. 
Suffice it to say that with sixteen pools to schedule recompose actions for as part of the monthly patch cycle, it can get rather tedious and time consuming to do it through the VMware View Administrator.  That is where PowerShell comes in.  View ships with set of PowerCLI cmdlets, and these can be run from any connection broker in your environment.  You can execute the script remotely, but the script file will need to be placed on your View Connection Broker.
I currently schedule this script to run using the Community Edition of the JAMS Job Scheduler, but I will be looking at using vCenter Orchestrator in the future to tie in automation of taking and removing snapshots.
The original inspiration for, and bits of, this script were originally written by Greg Carriger.  You can view his work on his blog.  My version does not take or remove any snapshots, and my version will work with multiple pools that are based on the same Parent VM.  The full script is availabe to download here.
Prerequisites:
PowerCLI 5.1 or greater installed on the Connection Broker
View PowerCLI snapin
PowerShell 2.0 or greater
View requires the full snapshot path in order to update the pool and do a recompose, so one of the first things that needs to be done is build the snapshot path.  This can be a problem if you’re not very good at cleaning up old snapshots (like I am…although I have a script for that now too).  That issue can be solved with the code below.
Function
Build-SnapshotPath
{
Param($ParentVM)
##
CreateSnapshotPath$Snapshots=Get-Snapshot-VM$ParentVM$SnapshotPath=“”ForEach($Snapshotin$Snapshots){$SnapshotName=$Snapshot.name$SnapshotPath=$SnapshotPath+“/”+$snapshotname}Return$snapshotpath}

Once you have our snapshot path constructed, you need to identify the pools that are based around the ParentVM.
$Pools
=Get-Pool|Where {$_.ParentVMPath-like“*$ParentVM*”}
A simple foreach loop can be used to iterate through and update your list of pools once you know which pools you need to update.  This section of code will update the default snapshot used for desktops in the pool, schedule the recompose operation, and write out to the event log that the operation was scheduled. 
Stop on Error is set to false as this script is intended to be run overnight, and View can, and will, stop a recompose operation over the slightest error.  This can leave destkops stuck in a halted state and inacccessible when staff come in to work the following morning.
ForEach
($Poolin$Pools)
{
$PoolName=$Pool.Pool_ID$ParentVMPath=$Pool.ParentVMPath#Update Base Image for PoolUpdate-AutomaticLinkedClonePool-pool_id$Poolname-parentVMPath$ParentVMPath-parentSnapshotPath$SnapshotPath## Recompose
##Stop on Error set to false. This will allow the pool to continue recompose operations after hours if a single vm encounters an error rather than leaving the recompose tasks in a halted state.
Get-DesktopVM-pool_id$Poolname|Send-LinkedCloneRecompose-schedule$Time-parentVMPath$ParentVMPath-parentSnapshotPath$SnapshotPathforceLogoff:$truestopOnError:$falseWrite-EventLogLogNameApplicationSourceVMwareView” –EntryTypeInformationEventID 9000 –MessagePool$Poolnamewillstarttorecomposeat$Timeusing$snapshotname.”
}

Two Potential PowerCLI Flings and One Cool New PowerCLI Command

While I was at VMWorld this week, I attended two great sessions on PowerCLI put on by Alan Renouf (Twitter).  Alan is one of the top two PowerCLI experts and a VMware Technical Marketing specialist on PowerCLI and Automation.  The two sessions that I attended were:

VSVC4944 – PowerCLI Best Practices – A Deep Dive –  A presentation with Luc Dekens (Twitter).  Luc is right up there with Alan in the top two of PowerCLI experts.

VSVC5931 – PowerCLI What’s New? Administrating with the CLI Was Never Easier

Before I talk about the two potential Flings, I want to mention a new PowerCLI command that is coming with vSphere 5.5 –  Open-VMConsole.  This command does exactly what it says on the tin –  it opens up the VM console in a web browser.  This feature allows administators direct access to a VM console without having to open either the Web Client or the C# client.  Alan demonstrated one interesting application of this cmdlet during his talk –  he built a simple PowerShell form using Primalforms that could be distributed to administrators to allow them to open the console without having to give them access to either client.  My environment is fairly small with few administrators, so I don’t see too much of an application for this where I’m at.  But there are huge potential uses for this in limiting access to the console of specific VMs without also giving application owners/administrators access to the vSphere client.

That’s not the only new addition to PowerCLI in 5.5.  There are also new cmdlets for working with Inventory Tags and expanded cmdlets for working with Virtual Distributed Switches.

Two exciting new potential VMware Flings/features were demonstrated during these sessions that take PowerShell and PowerCLI to the next level –  WebCommander, a web browser-based method of launching PowerShell scripts, and a PowerCLI window that can be launched from within the vSphere Web Client that was unofficially named “PowerWeb” by someone in the audience of the session I attended.  Both of these options will allow administrators who run Linux or OSX on their desktop to utilize PowerShell for their

“PowerWeb” or the PowerCLI vCenter Web Client Option –  This fling, which hopefully will make it into a future release of vCenter as a supported feature, adds links for a PowerCLI console and script window to the vCenter Web Client.  Administrators can execute PowerShell and PowerCLI scripts from directly within their web browser.  The current version only appears to work with the Windows version of vCenter, but it should be possible in the future to redirect the PowerCLI interface to a Windows Server when running the vCenter Appliance.

WebCommander –  WebCommander is a web portal for facilitating automation by presenting PowerShell and PowerCLI scripts to end-users and Administrators.  The scripts are run on a local Windows server and presented to the web via PHP.  This fling will facilitate self-service options by allowing Administrators to publish out PowerShell scripts so that they can be easily executed.

I’m most excited for seeing the WebCommander fling as I have an immediate use for something like this in my $work environment as we shuffle around help desk operations.