One of the common questions I see is around integrating VMware Horizon with Microsoft Azure MFA. Natively, Horizon only supports RSA and RADIUS-based multifactor authentication solutions. While it is possible to configure Azure MFA to utilize RADIUS, it requires Network Policy Server and a special plugin for the integration (Another option existed – Azure MFA Server, but that is no longer available for new implementations as of July 2019).
Earlier this week, VMware released Horizon 7.11 with Unified Access Gateway 3.8. The new UAG contains a pretty cool new feature – the abilility to utilize SAML-based multifactor authentication solutions. SAML-based multifactor identifaction allows Horizon to consume a number of modern cloud-based solutions. This includes Microsoft’s Azure MFA solution.
And…you don’t have to use TrueSSO in order to implement this.
If you’re interested in learning about how to configure Unified Access Gateways to utilize Okta for MFA, as well as tips around creating web links for Horizon applications that can be launched from an MFA portal, you can read the operational tutorial that Andreano Lanusso wrote. It is currently available on the VMware Techzone site.
Prerequisites
Before you can configure Horizon to utilize Azure MFA, there are a few prerequisites that will need to be in place.
First, you need to have licensing that allows your users to utilize the Azure MFA feature. Microsoft bundles this into their Office 365 and Microsoft 365 licensing skus as well as their free version of Azure Active Directory.
Note: Not all versions of Azure MFA have the same features and capabilities. I have only tested with the full version of Azure MFA that comes with the Azure AD Premium P1 license. I have not tested with the free tier or MFA for Office 365 feature-level options.
Second, you will need to make sure that you have Azure AD Connect installed and configured so that users are syncing from the on-premises Active Directory into Azure Active Directory. You will also need to enable Azure MFA for users or groups of users and configure any MFA policies for your environment.
If you want to learn more about configuring the cloud-based version of Azure MFA, you can view the Microsoft documentation here.
There are a few URLs that we will need when configuring single sign-on in Azure AD. These URLs are:
- Portal URL: https://horizon.uag.url/portal
- SAML URL: https://horizon.uag.url/portal/samlsso
Case sensitivity matters here. If you put caps in the SAML URL, you may receive errors when uploading your metadata file.
Configuring Horizon UAGs as a SAML Application in Azure AD
The first thing we need to do is create an application in Azure Active Directory. This will allow the service to act as a SAML identity provider for Horizon. The steps for doing this are:
- Sign into your Azure Portal. If you just have Office 365, you do have Azure Active Directory, and you can reach it from the Office 365 Portal Administrator console.
- Go into the Azure Active Directory blade.
- Click on Enterprise Applications.

- Click New Application.
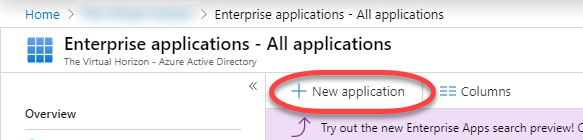
- Select Non-Gallery Application.

- Give the new application a name.

- Click Add.
- Before we can configure our URLs and download metadata, we need to assign users to the app. Click 1. Assign Users and Groups
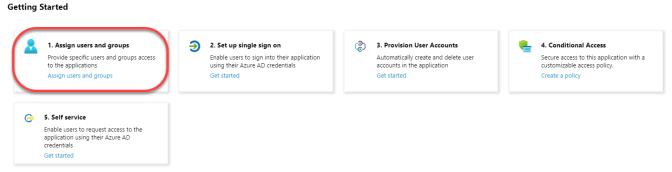
- Click Add User

- Click where it says Users and Groups – None Selected.

- Select the Users or Groups that will have access to Horizon. There is a search box at the top of the list to make finding groups easier in large environments.
Note: I recommend creating a large group to nest your Horizon user groups in to simplify setup. - Click Add.
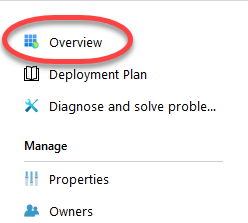
- Click Overview.
- Click 2. Set up single sign on.

- In the section labeled Basic SAML Configuration, click the pencil in the upper right corner of the box. This will allow us to enter the URLs we use for our SAML configuration.

- Enter the following items. Please note that the URL paths are case sensitive, and putting in PORTAL, Portal, or SAMLSSO will prevent this from being set up successfully:
- In the Identifier (Entity ID) field, enter your portal URL. It should look like this:
https://horizon.uag.url/portal - In the Reply URL (Assertion Consumer Service URL) field, enter your uag SAML SSO URL. It should look like this:
https://horizon.uag.url/portal/samlsso - In the Sign on URL, enter your uag SAML SSO URL. It should look like this:
https://horizon.uag.url/portal/samlsso

- In the Identifier (Entity ID) field, enter your portal URL. It should look like this:
- Click Save.
- Review your user attributes and claims, and adjust as necessary for your environment. Horizon 7 supports logging in with a user principal name, so you may not need to change anything.
- Click the download link for the Federation XML Metadata file.

We will use our metadata file in the next step to configure our identity provider on the UAG.
Once the file is downloaded, the Azure AD side is configured.
Configuring the UAG
Once we have completed the Azure AD configuration, we need to configure our UAGs to utilize SAML for multifactor authentication.
In order to do these steps, you will need to have an admin password set on the UAG appliance in order to access the Admin interface. I recommend doing the initial configuration and testing on a non-production appliance. Once testing is complete, you can either manually apply the settings to the production UAGs or download the configuration INI file and copy the SAML configuration into the production configuration files for deployment.
Note: You can configure SAML on the UAGs even if you aren’t using TrueSSO. If you are using this feature, you may need to make some configuration changes on your connection servers. I do not use TrueSSO in my lab, so I have not tested Azure MFA on the UAGs with TrueSSO.
The steps for configuring the UAG are:
- Log into the UAG administrative interface.
- Click Configure Manually.
- Go to the Identity Bridging Settings section.
- Click the gear next to Upload Identity Provider Metadata.

- Leave the Entity ID field blank. This will be generated from the metadata file you upload.
- Click Select.

- Browse to the path where the Azure metadata file you downloaded in the last section is stored. Select it and click Open.

- If desired, enable the Always Force SAML Auth option.
Note: SAML-based MFA acts differently than RADIUS and RSA authentication. The default behavior has you authenticate with the provider, and the provider places an authentication cookie on the machine. Subsequently logins may redirect users from Horizon to the cloud MFA site, but they may not be force to reauthenticate. Enabling the Always Force SAML Auth option makes SAML-based Cloud MFA providers behave similiarly to the existing RADIUS and RSA-based multifactor solutions by requiring reauthentication on every login. Please also be aware that things like Conditional Access Policies in Azure AD and Azure AD-joined Windows 10 devices may impact the behavior of this solution. - Click Save.

- Go up to Edge Services Settings and expand that section.
- Click the gear icon next to Horizon Edge Settings.
- Click the More button to show all of the Horizon Edge configuration options.
- In the Auth Methods field, select one of the two options to enable SAML:
- If you are using TrueSSO, select SAML
- If you are not using TrueSSO, select SAML and Passthrough

- Select the identity provider that will be used. For Azure MFA, this will be the one labeled https://sts.windows.net
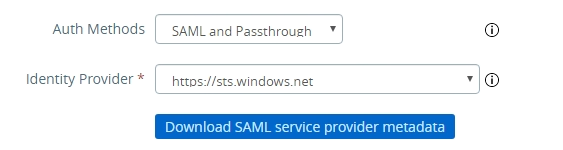
- Click Save.
SAML authentication with Azure MFA is now configured on the UAG, and you can start testing.
User Authentication Flows when using SAML
Compared to RADIUS and RSA, user authentication behaves a little differently when using SAML-based MFA. When a user connects to a SAML-integrated environment, they are not prompted for their RADIUS or RSA credentials right away.
After connecting to the Horizon environment, the user is redirected to the website for their authentication solution. They will be prompted to authenticate with this solution with their primary and secondary authentication options. Once this completes, the Horizon client will reopen, and the user will be prompted for their Active Directory credentials.
You can configure the UAG to use the same username for Horizon as the one that is used with Azure AD, but the user will still be prompted for a password unless TrueSSO is configured.

You must be logged in to post a comment.